Ok I had some trouble getting this up and running so I thought I'd put a small step by step guide for anyone interested in using the MQ2AutoLogin plugin (it is very nice).
This guide assumes you have the MQ2AutoLogin plugin installed already.
First you need to start the file MacroQuest.exe from your MQ2 folder. Right click the icon on the bottom of the screen and choose INI File. Under [Plugins] add the line mq2autologin=mq2autologin.
Next open a text editor of some sort (notepad works fine) and create the .ini file. Cut and Paste the Example below then add your own Station Name, Password, Server, and Character. Use the server names listed below that where it says Server=.
Once you've done that, save it as MQ2AutoLogin.ini
SERVER NAMES
fippy
vulak
mayong
antonius
bertox
bristle
cazic
drinal
erollisi
firiona
luclin
povar
rathe
tunare
xegony
zek
Once you have done that go to the folder that you have Everquest installed in and look for the file eqgame.exe. Mine is here D:\Sony Online Entertainment\Installed Games\EverQuest\eqgame.exe . Right click on the file and select Send to - Desktop(Create Shortcut). This will put a shortcut on your desktop.
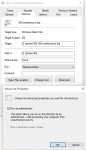
Next you will need to go to your desktop, right click on your new shortcut and select properties. Click the Shortcut tab and add patchme /login to the end. It will look like something like this when you are done "C:\Users\Public\Sony Online Entertainment\Installed Games\EverQuest\eqgame.exe" patchme /login
*Note - Make sure you add the patchme /login AFTER the end quotes.
Once you have done that you should be set. When you want to play Everquest just run MacroQuest and then click your new Everquest shortcut on your desktop. Every time you click it another instance will load up, working from Session1 to whatever session number you decide to end at. I box 4 and this works really well.
Please this is my first guide (I'm a fairly new member) if you have any suggestions or see anything I screwed up just let me know and I shall fix it!
This guide assumes you have the MQ2AutoLogin plugin installed already.
First you need to start the file MacroQuest.exe from your MQ2 folder. Right click the icon on the bottom of the screen and choose INI File. Under [Plugins] add the line mq2autologin=mq2autologin.
Next open a text editor of some sort (notepad works fine) and create the .ini file. Cut and Paste the Example below then add your own Station Name, Password, Server, and Character. Use the server names listed below that where it says Server=.
Once you've done that, save it as MQ2AutoLogin.ini
[Settings]
KickActiveCharacter=1
UseStationNamesInsteadOfSessions=0
[Session1]
StationName=Your Station Name Here
Password=My Password Here
Server=Server Name Here
Character=Your Character Name Here
[Session2]
StationName=Your Station Name Here
Password=My Password Here
Server=Server Name Here
Character=Your Character Name Here
[Session3]
StationName=Your Station Name Here
Password=Your Password Here
Server=Server Name Here
Character=Your Character Name Here
[Session4]
StationName=Your Station Name Here
Password=Your Password Here
Server=Server Name Here
Character=Your Character Name Here
KickActiveCharacter=1
UseStationNamesInsteadOfSessions=0
[Session1]
StationName=Your Station Name Here
Password=My Password Here
Server=Server Name Here
Character=Your Character Name Here
[Session2]
StationName=Your Station Name Here
Password=My Password Here
Server=Server Name Here
Character=Your Character Name Here
[Session3]
StationName=Your Station Name Here
Password=Your Password Here
Server=Server Name Here
Character=Your Character Name Here
[Session4]
StationName=Your Station Name Here
Password=Your Password Here
Server=Server Name Here
Character=Your Character Name Here
SERVER NAMES
fippy
vulak
mayong
antonius
bertox
bristle
cazic
drinal
erollisi
firiona
luclin
povar
rathe
tunare
xegony
zek
Once you have done that go to the folder that you have Everquest installed in and look for the file eqgame.exe. Mine is here D:\Sony Online Entertainment\Installed Games\EverQuest\eqgame.exe . Right click on the file and select Send to - Desktop(Create Shortcut). This will put a shortcut on your desktop.
Next you will need to go to your desktop, right click on your new shortcut and select properties. Click the Shortcut tab and add patchme /login to the end. It will look like something like this when you are done "C:\Users\Public\Sony Online Entertainment\Installed Games\EverQuest\eqgame.exe" patchme /login
*Note - Make sure you add the patchme /login AFTER the end quotes.
Once you have done that you should be set. When you want to play Everquest just run MacroQuest and then click your new Everquest shortcut on your desktop. Every time you click it another instance will load up, working from Session1 to whatever session number you decide to end at. I box 4 and this works really well.
Please this is my first guide (I'm a fairly new member) if you have any suggestions or see anything I screwed up just let me know and I shall fix it!