


Dozecar
Well-known member
- Joined
- Mar 21, 2016
- RedCents
- 1,696¢
This is the second task handed out by Belira. It's a good farm because it drops items not in the Darkness mission. You get the task by saying stop. Remember this because once you complete it, her hail response to you changes and no longer includes the clicky word. I banged my head on this mission over and over till recently when it became much easier.
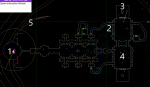
1. You zone in at the same place you do for the Darkness task. Make your way into the build to the 2 marked on the map.
2. Set camp here, for a moment. There are 2 Lookouts (flying mobs - see invis) you want to pull to here and kill. You are on a timer from the time you aggro them. The reason you want to begin here is because by pulling them, You won't have to deal with the 2 unmezzable mechanics that are behind the statue (3)
3. Once the lookouts are dead move your group to 3. There will be 2 mechanic gnomework mobs. They are unmezzable. Kill both, then kill the ticking device flying there. Once the ticking device is dead, the first timer for this mission ends.
4. Make your way south to the next room, as soon as you enter it you will aggro the 2 Lookouts and 2 of the 3 mechanic mobs will leave the northern platform they are on, and move south to the platform where the Legendary Clockwork is inactive, this starts the second timer. Lookouts are mezzable, mechanics are not but at this point they are attackable but not active. You want to use burns now. Kill all three mechanics fast. Don't forget the 3rd that stayed on the platform to the north. If fast enough, the Legendary Clockwork won't go live. If it does, switch to it then finish off the rest. This is probably one of the roughest points in the mission. Once you get past it, unless it bugs out the rest of the mission is easy. Once the mechanics and Lookouts are dead, the second timer ends. You will receive a Tin Note.
2 lookouts (mezzable)
3 Mechanics (non mezzable but non active)
1 Legendary Clockwork
5. Make your way back out to the zone in area and turn Right. Head up the path till it splits (5) and head up that split. This will take you to the landing pad area.
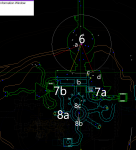
6. Invis up and head to the center of the landing platform. Once there, kill the 2 mobs near the targetable box marked a. Then Pull and kill the 2 mobs inside the hanger at b, single mobs at c and d. Once they are all dead, dps the boxes until destroyed.
7. Now head to the ramps at 7a. This is a pain when boxing. You will need to move up the ramp, cometome, move sideways to next ramp, cometome, up ramp, cometome, etc. You can try running it and just come to me, but pathing in this zone is screwy and its not uncommon to have the boxes go running off odd directions. Once up top head to 7b and head into that tunnel to 8a.
8. Set up at 8a, just in front of the elevator. You need to kill 5 triggered mobs. They are supposed to spawn 1 at a time, but this portion bugs out a lot. Take your puller and head to 8b, then run up that ramp into the lightning area thingy, then back out the north ramp to 8c. Don't hang out in the lightning area. This will spawn An ancient security guard. which will come out of one of the 2 halls to either side of 8c. Pull back to your group and kill. Rinse repeat 4 more times. This part can bug out a lot. guards can fall through the world or warp upward on spawn. Once I ended up with 3 of them at once. Loads of fun. Once you kill all 5 and get the update, jump on the elevator behind you (8a) and ride it up. It's much easier to just move 1 char at a time then to try all at once.
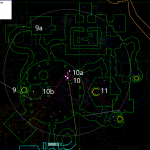
9. You come up at point 9. Head up the tunnel to 9a, then head south down the tunnel to the furnace room.
10. Head to spot 10 and set camp. You are on a timer again here, I'm not sure if it starts from the end of the proceeding step or once you aggro the first mob here. There should be 2-4 mobs at the furnace (10b.) pull them to your camp and kill. Every 2-3 minutes, 2 more will spawn, 1 at 10a, and one to the west and it will path to 10b. You need to kill 10 to complete this step. If you take too long killing a mob after aggroing it, it will path back to furnace. It's still attackable during this return home though it's regen is greatly accelerated.
11. The named or ph will spawn now. Most of the time, it spawns right at camp 10, but other times it's spawned elsewhere, never found out where, I use a pet or other method to pull it. One time it aggro'd me when I was headed back to ent in the hanger area. Once it's dead or if it didn't spawn, you need to kill the final mob Glimmerlove. If you have a pet, you can target him and use the pet to pull him. Otherwise you need to head up the 10a tunnel to the elevator marked 11. Take that up to the top. I didn't make a map for this because the map i have looks like trash up here. There is a corkscrew ramp heading up to a platform where glimmerlove is. There will be a few KoS mobs along the way.
Once Glimmerlove is dead, head back to the zone in and give Belira the tin note you received after step 2 (of the task, step 4 in this guide.) This pops the chest.
1. You zone in at the same place you do for the Darkness task. Make your way into the build to the 2 marked on the map.
2. Set camp here, for a moment. There are 2 Lookouts (flying mobs - see invis) you want to pull to here and kill. You are on a timer from the time you aggro them. The reason you want to begin here is because by pulling them, You won't have to deal with the 2 unmezzable mechanics that are behind the statue (3)
3. Once the lookouts are dead move your group to 3. There will be 2 mechanic gnomework mobs. They are unmezzable. Kill both, then kill the ticking device flying there. Once the ticking device is dead, the first timer for this mission ends.
4. Make your way south to the next room, as soon as you enter it you will aggro the 2 Lookouts and 2 of the 3 mechanic mobs will leave the northern platform they are on, and move south to the platform where the Legendary Clockwork is inactive, this starts the second timer. Lookouts are mezzable, mechanics are not but at this point they are attackable but not active. You want to use burns now. Kill all three mechanics fast. Don't forget the 3rd that stayed on the platform to the north. If fast enough, the Legendary Clockwork won't go live. If it does, switch to it then finish off the rest. This is probably one of the roughest points in the mission. Once you get past it, unless it bugs out the rest of the mission is easy. Once the mechanics and Lookouts are dead, the second timer ends. You will receive a Tin Note.
2 lookouts (mezzable)
3 Mechanics (non mezzable but non active)
1 Legendary Clockwork
5. Make your way back out to the zone in area and turn Right. Head up the path till it splits (5) and head up that split. This will take you to the landing pad area.
6. Invis up and head to the center of the landing platform. Once there, kill the 2 mobs near the targetable box marked a. Then Pull and kill the 2 mobs inside the hanger at b, single mobs at c and d. Once they are all dead, dps the boxes until destroyed.
7. Now head to the ramps at 7a. This is a pain when boxing. You will need to move up the ramp, cometome, move sideways to next ramp, cometome, up ramp, cometome, etc. You can try running it and just come to me, but pathing in this zone is screwy and its not uncommon to have the boxes go running off odd directions. Once up top head to 7b and head into that tunnel to 8a.
8. Set up at 8a, just in front of the elevator. You need to kill 5 triggered mobs. They are supposed to spawn 1 at a time, but this portion bugs out a lot. Take your puller and head to 8b, then run up that ramp into the lightning area thingy, then back out the north ramp to 8c. Don't hang out in the lightning area. This will spawn An ancient security guard. which will come out of one of the 2 halls to either side of 8c. Pull back to your group and kill. Rinse repeat 4 more times. This part can bug out a lot. guards can fall through the world or warp upward on spawn. Once I ended up with 3 of them at once. Loads of fun. Once you kill all 5 and get the update, jump on the elevator behind you (8a) and ride it up. It's much easier to just move 1 char at a time then to try all at once.
9. You come up at point 9. Head up the tunnel to 9a, then head south down the tunnel to the furnace room.
10. Head to spot 10 and set camp. You are on a timer again here, I'm not sure if it starts from the end of the proceeding step or once you aggro the first mob here. There should be 2-4 mobs at the furnace (10b.) pull them to your camp and kill. Every 2-3 minutes, 2 more will spawn, 1 at 10a, and one to the west and it will path to 10b. You need to kill 10 to complete this step. If you take too long killing a mob after aggroing it, it will path back to furnace. It's still attackable during this return home though it's regen is greatly accelerated.
11. The named or ph will spawn now. Most of the time, it spawns right at camp 10, but other times it's spawned elsewhere, never found out where, I use a pet or other method to pull it. One time it aggro'd me when I was headed back to ent in the hanger area. Once it's dead or if it didn't spawn, you need to kill the final mob Glimmerlove. If you have a pet, you can target him and use the pet to pull him. Otherwise you need to head up the 10a tunnel to the elevator marked 11. Take that up to the top. I didn't make a map for this because the map i have looks like trash up here. There is a corkscrew ramp heading up to a platform where glimmerlove is. There will be a few KoS mobs along the way.
Once Glimmerlove is dead, head back to the zone in and give Belira the tin note you received after step 2 (of the task, step 4 in this guide.) This pops the chest.
Last edited:

