
• You've discovered RedGuides, an EverQuest multi-boxing and scripting community 🧙‍♀️⚙️. We want you to play several EQ characters at once, come join us and say hello! 👋

  • A TLP without truebox has thawed (Very Vanilla ready)
    Frostreaver

Guide - GMM: Ironing out the legion

Dozecar

Well-known member
Joined
Mar 21, 2016
RedCents
1,696¢
This is the second task handed out by Belira. It's a good farm because it drops items not in the Darkness mission. You get the task by saying stop. Remember this because once you complete it, her hail response to you changes and no longer includes the clicky word. I banged my head on this mission over and over till recently when it became much easier.
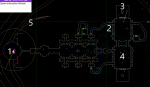
ironing1a.png

1. You zone in at the same place you do for the Darkness task. Make your way into the build to the 2 marked on the map.

2. Set camp here, for a moment. There are 2 Lookouts (flying mobs - see invis) you want to pull to here and kill. You are on a timer from the time you aggro them. The reason you want to begin here is because by pulling them, You won't have to deal with the 2 unmezzable mechanics that are behind the statue (3)

3. Once the lookouts are dead move your group to 3. There will be 2 mechanic gnomework mobs. They are unmezzable. Kill both, then kill the ticking device flying there. Once the ticking device is dead, the first timer for this mission ends.

4. Make your way south to the next room, as soon as you enter it you will aggro the 2 Lookouts and 2 of the 3 mechanic mobs will leave the northern platform they are on, and move south to the platform where the Legendary Clockwork is inactive, this starts the second timer. Lookouts are mezzable, mechanics are not but at this point they are attackable but not active. You want to use burns now. Kill all three mechanics fast. Don't forget the 3rd that stayed on the platform to the north. If fast enough, the Legendary Clockwork won't go live. If it does, switch to it then finish off the rest. This is probably one of the roughest points in the mission. Once you get past it, unless it bugs out the rest of the mission is easy. Once the mechanics and Lookouts are dead, the second timer ends. You will receive a Tin Note.

2 lookouts (mezzable)
3 Mechanics (non mezzable but non active)
1 Legendary Clockwork

5. Make your way back out to the zone in area and turn Right. Head up the path till it splits (5) and head up that split. This will take you to the landing pad area.
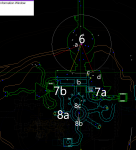
ironing2a.png

6. Invis up and head to the center of the landing platform. Once there, kill the 2 mobs near the targetable box marked a. Then Pull and kill the 2 mobs inside the hanger at b, single mobs at c and d. Once they are all dead, dps the boxes until destroyed.

7. Now head to the ramps at 7a. This is a pain when boxing. You will need to move up the ramp, cometome, move sideways to next ramp, cometome, up ramp, cometome, etc. You can try running it and just come to me, but pathing in this zone is screwy and its not uncommon to have the boxes go running off odd directions. Once up top head to 7b and head into that tunnel to 8a.

8. Set up at 8a, just in front of the elevator. You need to kill 5 triggered mobs. They are supposed to spawn 1 at a time, but this portion bugs out a lot. Take your puller and head to 8b, then run up that ramp into the lightning area thingy, then back out the north ramp to 8c. Don't hang out in the lightning area. This will spawn An ancient security guard. which will come out of one of the 2 halls to either side of 8c. Pull back to your group and kill. Rinse repeat 4 more times. This part can bug out a lot. guards can fall through the world or warp upward on spawn. Once I ended up with 3 of them at once. Loads of fun. Once you kill all 5 and get the update, jump on the elevator behind you (8a) and ride it up. It's much easier to just move 1 char at a time then to try all at once.
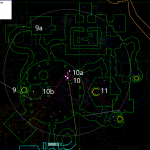
ironing3a.png

9. You come up at point 9. Head up the tunnel to 9a, then head south down the tunnel to the furnace room.

10. Head to spot 10 and set camp. You are on a timer again here, I'm not sure if it starts from the end of the proceeding step or once you aggro the first mob here. There should be 2-4 mobs at the furnace (10b.) pull them to your camp and kill. Every 2-3 minutes, 2 more will spawn, 1 at 10a, and one to the west and it will path to 10b. You need to kill 10 to complete this step. If you take too long killing a mob after aggroing it, it will path back to furnace. It's still attackable during this return home though it's regen is greatly accelerated.

11. The named or ph will spawn now. Most of the time, it spawns right at camp 10, but other times it's spawned elsewhere, never found out where, I use a pet or other method to pull it. One time it aggro'd me when I was headed back to ent in the hanger area. Once it's dead or if it didn't spawn, you need to kill the final mob Glimmerlove. If you have a pet, you can target him and use the pet to pull him. Otherwise you need to head up the 10a tunnel to the elevator marked 11. Take that up to the top. I didn't make a map for this because the map i have looks like trash up here. There is a corkscrew ramp heading up to a platform where glimmerlove is. There will be a few KoS mobs along the way.

Once Glimmerlove is dead, head back to the zone in and give Belira the tin note you received after step 2 (of the task, step 4 in this guide.) This pops the chest.
 
Last edited:
Awesome work!

Few things I can add:

1. Before you start, make sure you set your campfire in the static zone at belira

4. Before you run into the south room, you can target and pull the 2 flying robots. No need to mez them, you just pull them out and kill them. The timer on the mechanics doesn't start until you enter the room.

8. I'd recommend pulling the stupid iron legion spider thing in the middle of the security room, cause it doesn't have the iron legion faction hit, and means you can target the robot easier. So get your crew set up in front of the elevator, move around til you can see into the middle of the sparky electrical area, pull the spider thing and kill it, then with your puller / driving toon walk up onto the platform (which gives you a 30k ish dd, and activates the robots) then f8 like a crazy man and agro the robot fast. If you take too long it bugs out and disappears upstairs to where the elevator pops right next to the boiler room, and it sucks to fix it from there.
The hard part is when the 3 robot room is selected as the random door to open and activate the robots. They hit real hard, so unless you are good it's a problem. (note: a tbl t3 warrior with a good ini seems to do fine without CC, but can still be dicey).

11. If you have a bard, you can run up top and up the spiral path until you are above and behind Glimmerlove, and can barely see him from behind the boxes, then Silent Displacement him off his platform. Drop down, go to the elevator shaft, agro him, then drop down the elevator and run back to 10 and just chill. He'll turn up solo in 10-30 seconds.
Also, the room that you destroyed the boxes in up next to the landing platform is another spawn spot for the loot named. Found that out by randomly running through it on the way back and wiping.
After you kill Glimmerlove, campfire back and then /say ready to belira to go back into instance and do the hail, because mq2nav runs you back over the security area and spawns those asshole killer robots if you just /target belira, /nav target, and you wipe stupidly. Or I did anyway. Because running a full group through the bowels of GMM sucks balls.
 
If you have extra security guards up and/or you loose some up top from warping all you have to do is camp your toons to the char screen and then come back and they will be reset and won't jump you at the top of the elevator or during the next stage. Everyone needs to camp out, even someone fd.
 
Don't kill the legendary clockwork before all of the mechanics are dead, even if one doesn't aggro or you loose. I thought it was bugging out when I first started doing the mission. Also it's a good policy to kill any charmers first in any stage you come across them. Less time to mezz your tank.
 
Actually, I always kill the legendary, if he goes live, before the mechanics because he puts out so much dps, and never had an issue with it. I think they fixed the bug that used to cause issues, or it's just a random bug.
 
I ran through this mission tonight, based on this post. I'd like to point out a few things which I felt were missing, could enhance, and may help you in running through this boxing nightmare.

The mission has two timers. Get stuff done quickly and be aware of the pitfalls before you start this mission.

Step 0 -- DISABLE ALL AE abilities, etc. This creates such a mess, it's just not worth the extra DPS.

After wasting 2 hours of my day on this mess, I want to share some tidbits which I found useful while doing the mission; I'll explain in relationship to the original posters Step #'s to make it relevant.

Steps 1-3 are pure. I'd suggest running into the main room (North) and kill the two mobs (which seemed to auto-agro me while invis, every single time I ran this (4 times).

Before engaging in Step 4; what I found to work well was to pull the 2 flying mobs from the south into the north and kill. Then before running into the south room; target 2 of the three mobs and debuff them. Run into the south (they move from pedestal to the spider) Attack them, but if you are using KissAssist be sure to have a hotkey to your toons to actually start attacking as they do not attack back. If you are using MQ2Berzerker, I suggest running the entire mission in Chase mode.

Step 5 the author mentions turning left; but failed to point out this "left" would be as if you just zoned in. But we didn't. We just ran to the area from the museum, so actually turn left. You are headed to the landing pad area/warehouse.

Step 6 and 7 are pure; only thing I'd suggest is again to ensure that you have no AE taunt, warcry, ae dps, etc... Creates a mess, seriously.

Step 8 I tried twice and both times dumb things happened, my bad luck. I'd rather suggest setting up camp at 8c in the horse shoe area. Once you do, walk south in the Security Area (circle to south with lightning around it) and this will "spawn" the guard. For me the guard spawned in the horse shoe area. Just kill it, it's weak. Do this 5 times. Two of my 4 runs through 3 guards spawned at first. I had no mezzer, seriously easy.

Step 9 and 10 and 11 are dead on; this is the Ambassador of Loving area in case you know it better as that. I pulled the named with a pet and had to regroup, worked perfectly well.

Despite my anger with this mission and the pathing and the lack of flawless navigation through... I want to say a huge thank you to the original poster (Dozecar) what a great write up man! I've been avoiding this mission for ages and your post enticed me to do it. I just really don't ever want to do this again.


;
 
Actually, I always kill the legendary, if he goes live, before the mechanics because he puts out so much dps, and never had an issue with it. I think they fixed the bug that used to cause issues, or it's just a random bug.

I believe he's going active because of getting hit by an AE or running out of time, not a bug.
 
There are a few outright "fail" mechanics to this that people often think are bugs. First, killing too many of the non-aggressive clockworks is an outright fail. I'm not sure of the exact number and there is no indication of how close you are, but if you get an emote that "you have left the clockworks unable to defend themselves" you killed too many. Problem is that they have social agro with some of the aggressive mobs that need to be killed. I actually lost a chest on this when I left up an extra security guard from step 8. They're not auto-agro and if not engaged, they will roam a wide area of the zone. One roamed down to the chest area while I was just about to loot it. It agro'd my group and got assisted by the "no kill" mobs nearby. I had no problem clearing them out but it put me over the limit and booted me before I could loot the chest.

The second fail mechanic is in step 10. The clockworks that repair the furnace, if they finish, the mission is over. However, there's nothing to tell you that you failed, the mobs simply stop spawning and you can never get your quota to advance the script. A timer starts as soon as you kill the 5th security guard from step 8. From 8 to 10 you need to move fast. And every time that one of those little buggers goes back to repairing the furnace, you need to pull them off asap. I set my group right where the "10b" is on the map and tag them as they path through the room.

Some extra tips I'd like to share: for step 8, kill 5 An ancient security guard, I setup camp in the tunnel directly south of the "8b". That way, as soon as I'm done there, I can run south and up the ramps and it takes you right to room 10. /afollow is sufficient to get all my characters up there without needing to go up elevators 1 at a time. This should save you a lot of time getting up there and interrupting the furnace repair quicker.

Going from 4 to 6, you can take the tunnel that is due east of the "2" on @Dozecar 's map. /afollow up the ramps and it takes you right to "7b" and I pull all the mobs from step 6 to there before proceeding up to 8b.

This mission is not hard with a competent box group running KA. The "bugs" are not bugs, just poorly communicated mechanics.
 
I believe he's going active because of getting hit by an AE or running out of time, not a bug.

It's from time. I rarely have it happen now, my dps destroys the mechanics most of the time, but every so often stupidity happens and I lose a dps class and legendary goes live, so I switch to it, kill then back to mechanics.
 
Steps 1-3 are pure. I'd suggest running into the main room (North) and kill the two mobs (which seemed to auto-agro me while invis, every single time I ran this (4 times).

The Whirlygig mobs see invis, this set and the set in the southern room. I started pulling them to camp 2 then moving up on the platform so you don't have 4 mobs all at once while you're waiting for your group to follow you up and then unpause and get going. For me it's just easier to pull them and kill, then charge up the platform and grab the two unmezzable mechanics. I'd had things go bad charging all four, cleric gets aggro usually and things go downhil from there.

Before engaging in Step 4; what I found to work well was to pull the 2 flying mobs from the south into the north and kill. Then before running into the south room; target 2 of the three mobs and debuff them. Run into the south (they move from pedestal to the spider) Attack them, but if you are using KissAssist be sure to have a hotkey to your toons to actually start attacking as they do not attack back. If you are using MQ2Berzerker, I suggest running the entire mission in Chase mode.

I tried this last run and it worked well so I'm going to edit the guide and image to add a camp for the 2 flying mobs.

Step 5 the author mentions turning left; but failed to point out this "left" would be as if you just zoned in. But we didn't. We just ran to the area from the museum, so actually turn left. You are headed to the landing pad area/warehouse.

No, I just failed to put the right direction. lol Not sure why I put left. Edited it to reflect the correct the direction.

Step 6 and 7 are pure; only thing I'd suggest is again to ensure that you have no AE taunt, warcry, ae dps, etc... Creates a mess, seriously.

When I edit this one, I'm going to add a disclaimer reflecting this. All of my KA ini have been edited to remove all a/e abilities except a/e mez. I've just had too many problems with them being used and aggroing passive npcs. So I don't remember to mention it.

Step 8 I tried twice and both times dumb things happened, my bad luck. I'd rather suggest setting up camp at 8c in the horse shoe area. Once you do, walk south in the Security Area (circle to south with lightning around it) and this will "spawn" the guard. For me the guard spawned in the horse shoe area. Just kill it, it's weak. Do this 5 times. Two of my 4 runs through 3 guards spawned at first. I had no mezzer, seriously easy.

This portion is buggy as fuck. Mobs can warp up or down a couple levels. On the plus side, there are extras you can trigger to get your 5, but then you can have the warped mobs eventually show up and cause chaos. Usually the warping happens after the Guard leaves the horseshoe, it will enter the lightning area and then poof. But rarely they will just spawn/warp or perhaps just spawn in the wrong location. They are supposed to spawn in the horseshoe area and path out. In fact you can see inactive mobs in the little cubbies. If you look, there is one cubby with 3 in it. I've only ever had that go live early once. I don't think they were mezzable.

I'm going to try camping 8c and likely edit to reflect that. I liked the elevator because you are right there to go upstairs.

Despite my anger with this mission and the pathing and the lack of flawless navigation through... I want to say a huge thank you to the original poster (@Dozecar) what a great write up man! I've been avoiding this mission for ages and your post enticed me to do it. I just really don't ever want to do this again.

You're welcome. That was 100% my goal for posting. I had tried this mission a few times months ago and kept failing on the furnace. It annoyed me because I'd already farmed 5 luck for everyone on the darkness loot and wanted the loot from here. Then I tried about a month ago, just after the gmm nerf, and it was easy, I just blasted through it.

I've farmed it a bunch, but I'm not sure it's worth it. I noticed about 2 months ago, that my drops in the darkness mission got more selective. I got a lot more crap, over and over. With this mission I have the same, lots of drops I don't care about because they are equal to the darkness drops. My goal with farming this one, was to get the drops that were better AC.


There are a few outright "fail" mechanics to this that people often think are bugs. First, killing too many of the non-aggressive clockworks is an outright fail. I'm not sure of the exact number and there is no indication of how close you are, but if you get an emote that "you have left the clockworks unable to defend themselves" you killed too many. Problem is that they have social agro with some of the aggressive mobs that need to be killed. I actually lost a chest on this when I left up an extra security guard from step 8. They're not auto-agro and if not engaged, they will roam a wide area of the zone. One roamed down to the chest area while I was just about to loot it. It agro'd my group and got assisted by the "no kill" mobs nearby. I had no problem clearing them out but it put me over the limit and booted me before I could loot the chest.

The second fail mechanic is in step 10. The clockworks that repair the furnace, if they finish, the mission is over. However, there's nothing to tell you that you failed, the mobs simply stop spawning and you can never get your quota to advance the script. A timer starts as soon as you kill the 5th security guard from step 8. From 8 to 10 you need to move fast. And every time that one of those little buggers goes back to repairing the furnace, you need to pull them off asap. I set my group right where the "10b" is on the map and tag them as they path through the room.

There's actually 4 fail mechanics. I completely forget to mention the killing non aggros because I'd only read about it, I've never had it happen, as I mentioned above, my KA files have all AE abilities removed.

There is the timer for the first camp, with the ticking device, though honestly its almost impossible to fail. You get like 6 minutes to kill the 4 mobs and the device.

Then there is the unseen timer for the south room. I had that one bump me a few weeks ago because the mechanic that stays on it's platform to the north, never went active. I killed the 2, and the 2 whirlygigs, then went up to the landing pad, and while there got a message they had complete something because I suck and the mission failed. That's actually how I learned about him staying there.

Then there is the furnace timer. And that portion of the task has either been nerfed, or my dps is just that disgusting now. I am going to try your follow method from the previous camp, but even using the elevator, one at a time, I get to the furnace and clear what's there and end up sitting an waiting for spawns. I think they nerfed this because this was always my fail point.


I also thing there are some underlying mechanics we don't know about or aren't looking at correctly. For instance the south room timer, I think may be tied to the furnace room timer. I think when I failed recently, the message I got was they blew up the furnace (I don't recall 100%.)
 
I liked the elevator because you are right there to go upstairs.
There is another way up to the furnace that avoids that stupid elevator and all the toons make it up no problem with Kaen01's mesh.

From security go out the south tunnel (brown dirt) and just follow it up. First metal tunnel when you cannot go up farther.
Or just do /nav loc 795 48 336

PS I edited my mesh to make the center of the security room unpathable so no toons go through it spawning more bots
 
Last edited:
I have not even done the progression in gmm because most of the time i only play with bard, cleric, mage, 2 caster mercs, and a heal merc. I saw there were dps requirements and didn't think i could meet them. I have not saw much on the other quests and I'm wondering if they have dps requrients or if they need a real tank to complete. If anyone has use pet as the main tank on theses quests and missions other thank darkness i would be very interested in hearing from them. Now i have a few questions. Does every need to meet requirements or can someone with access request the mission for everyone. I'm thinking i should only try this if i can find at least a tank and heavy dps to join me.
 
Only 1 needs progression to request, don't think the Danger Zone even has requirements (but that one need fairly high dps)
 
Guide - GMM: Ironing out the legion

Users who are viewing this thread

Back
Top
Cart