Code:
_///////                   _//   _////                   _//
_//    _//                 _// _/    _//          _/     _//
_//    _//     _//         _//_//        _//  _//        _//   _//     _////
_/ _//       _/   _//  _// _//_//        _//  _//_// _// _// _/   _// _//
_//  _//    _///// _//_/   _//_//   _////_//  _//_//_/   _//_///// _//  _///
_//    _//  _/        _/   _// _//    _/ _//  _//_//_/   _//_/            _//
_//      _//  _////    _// _//  _/////     _//_//_// _// _//  _////   _// _//
+-----[    H A I L  A N D  W E L L  M E T ,  A D V E N T U R E R    ]-----+
|                                                                         |
|                                                                         |
|                        EVERQUEST: The Red Guide                         |
|                                                                         |
|                                                                         |
|  Hail! We're RedGuides, an organization for EverQuest players who       |
|  like playing semi-automated groups while exercising on our home gyms   |
|  and we're all out of home gyms.                                        |
|                                                                         |
|                                                                         |
|*~'`^`'~*-,._.,-*~'`^`'~*-,._.,-*~'`^`'~*-,._.,-*~'`^`'~*-,._.,-*~'`^`'~*|

|*~'`^`'~*-,._.,-*~'`^`'~*-,._.,-*~'`^`'~*-,._.,-*~'`^`'~*-,._.,-*~'`^`'~*|
|                                                                         |
|                         [  RG Member's Oath  ]                          |
|                                                                         |
|  All members solemnly swear upon their first-rolled toon:               |
|                                                                         |
|  ~~~~~~~~~~ I will be present at my keyboard while playing ~~~~~~~~~~   |
|  ~~~~~~~~~~~~~ I will socialize and not /flex too hard ~~~~~~~~~~~~~~   |
|  ~~~~~~~~~ I accept that some GMs hate and ban my playstyle ~~~~~~~~~   |
|  ~~~~~ I will always /camp my boxed toon for someone who's LFG ~~~~~~   |
|                                                                         |
|*~'`^`'~*-,._.,-*~'`^`'~*-,._.,-*~'`^`'~*-,._.,-*~'`^`'~*-,._.,-*~'`^`'~*|

|*~'`^`'~*-,._.,-*~'`^`'~*-,._.,-*~'`^`'~*-,._.,-*~'`^`'~*-,._.,-*~'`^`'~*|
|               If you like playing EQ, please buy a copy.                |
|                                                                         |
+----[   greetz to Sic, brainiac, Knightly, dannuic, CWTN, Derple   ]-----+
RG members try to keep things open; that includes our strategies, code, and our feelings. Anger is what we feel when we hear about warping, truebox circumvention, and other hacks, which is why we neither use nor speak of such hagcraft. Love is what we feel for EverQuest and our full-group playstyle, and we're excited to share it with you:
Making Accounts
everquest.com/registerMaking Characters
After you've made your accounts and have recorded all the emails, logins and passwords, (with a good password manager) create your characters on any non-truebox server. (Many of us play on Vox.)Group composition is discussed here almost daily, and "what's best" has far too many factors (encounter, level, expansion), but generally we recommend the following for your first group:
The Holy Trinity
- Three of your characters should fill the roles of tank, heal, and damage.
- Your healer should be a cleric. There is no substitute.
- Your tank should be a warrior. And your warrior should also be your "driver"; the character you manually control and from which you operate your entire group. For your first run, a taunt button is enough to worry about while you're managing five other characters.
- Damage. Melee DPS is generally better for low levels.
- Crowd control. It's not as important as the trinity, but adding a brd/enc will open much more content for your group.
- Ports. A druid or wizard will make travel much easier.
- Camp and exit all of your EverQuest windows.
- Download
redfetch.exeto somewhere you'll remember. Double-click to run the script.
(Feel free to install with pipx instead. Instructions are on the redfetch overview.) - Click the big blue Easy Update Button, and then "Yes" or "Always" on the popup to Download navigation meshes, and "Yes" or "Always" to Run Very Vanilla MQ

You now have every piece of software in this guide installed and ready to use!
- On first run, MacroQuest will ask you to Enter Master Password:
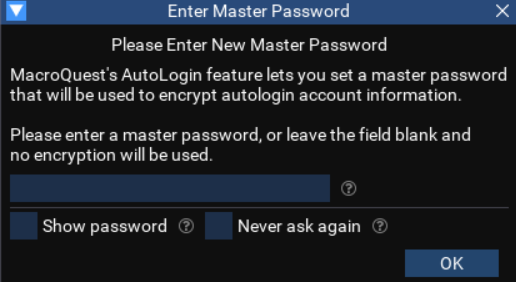
This provides security for the next section, where you'll store login information for each account. Dream up a password (record it somewhere safe) and hit OK.
This allows you to login all of your characters with a click.
- Right-click the MQ icon in your notification area. Select Auto Login --> Open Config

- Select Autologin --> Settings --> Manage EQ Installs --> Edit EQ Install --> EQ Path --> Choose
From there, use the picker to select your EverQuest directory (whereeqgame.exeexists) or write it yourself in the path field.

- Select Autologin --> Accounts --> Add Account
Fill with an Account/Password from step 1, and use the existing EQ Install you made in the previous step (click the blank text area to select) and hit OK. Repeat this for each account.

- Right-click one of the accounts you just added --> Launch Client & Log In --> In EverQuest, select your server and log in to the "character select" screen --> Quit --> Close the EverQuest window. Do this, one at a time, for each account you added. (This makes Autologin add your character names)
View attachment autologin_charselect.mp4
- Select AutoLogin --> Profiles --> Add Group. Dream up a group name --> OK.
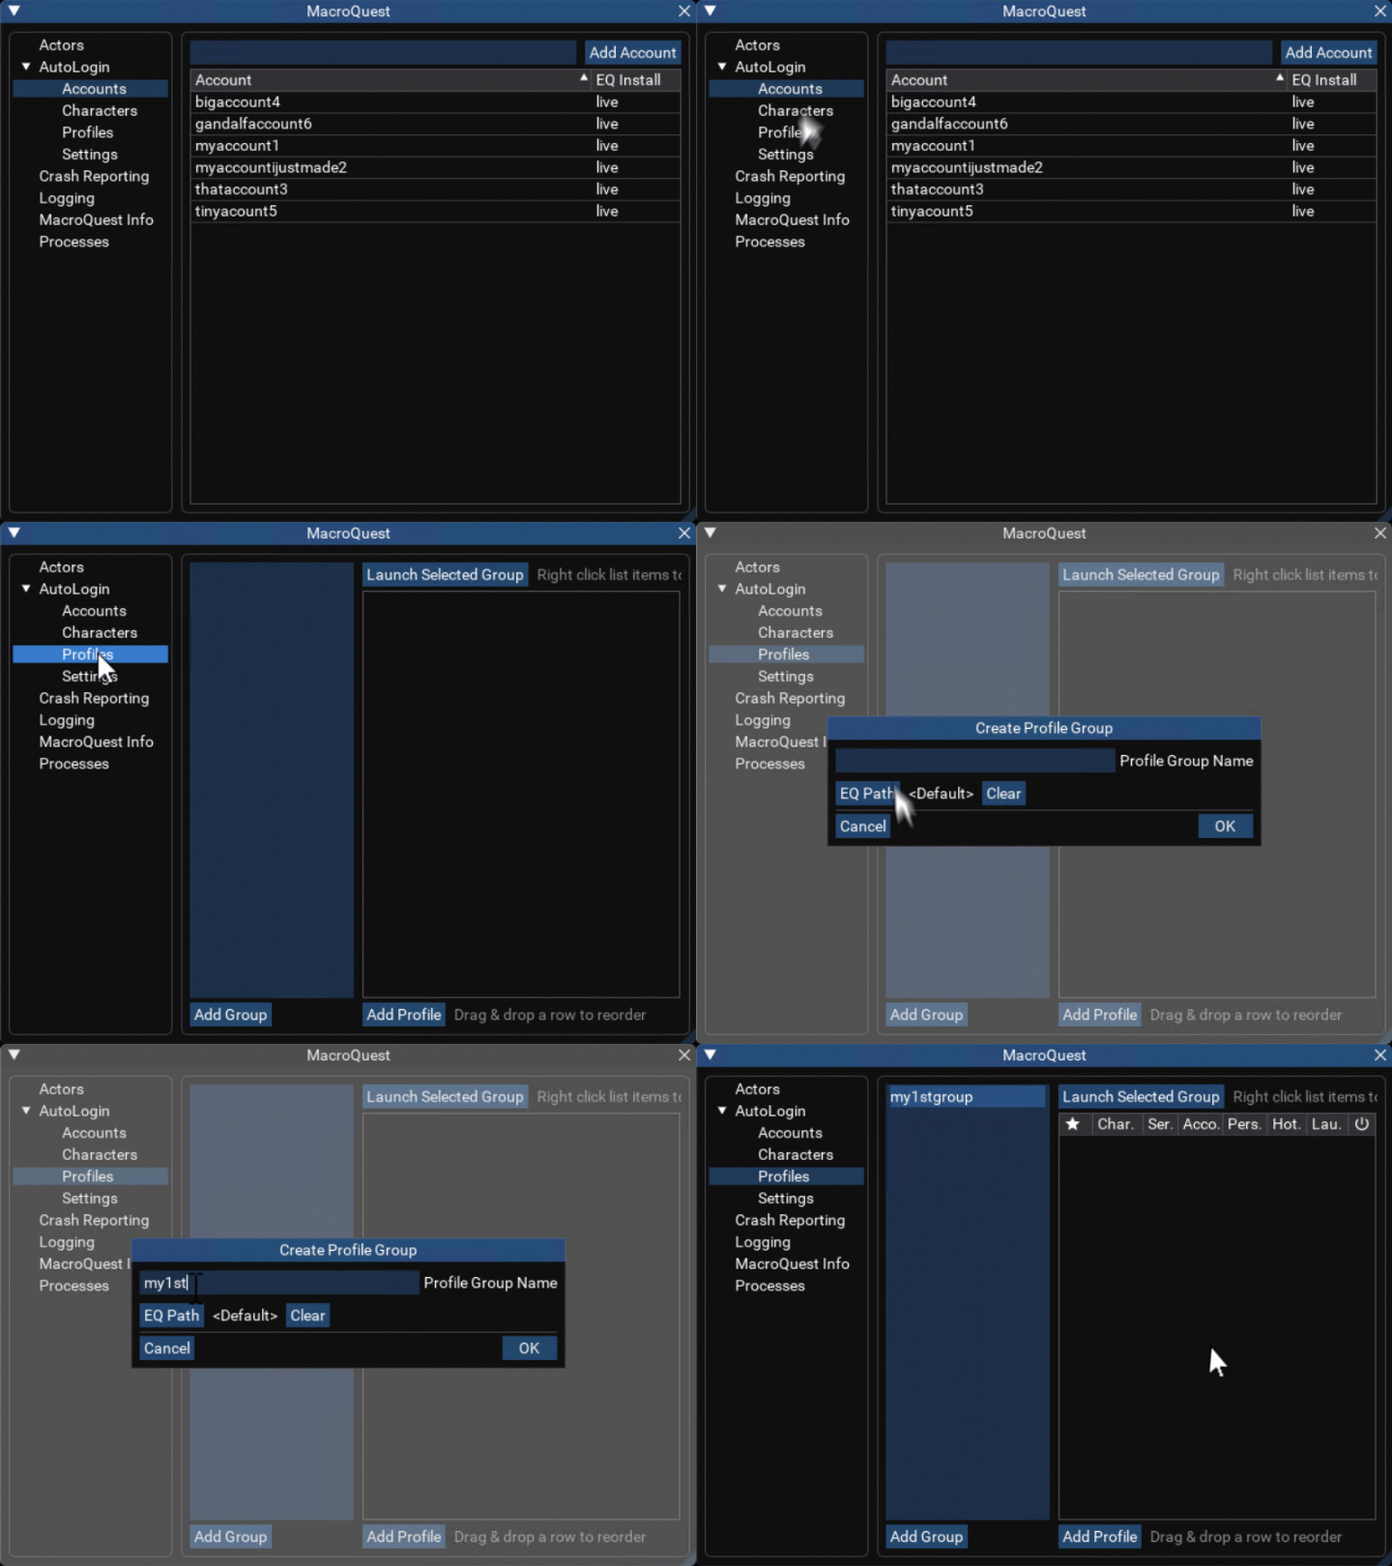
- Select AutoLogin --> Characters --> Right-click a character --> Add to Profile Group --> Select the previously made profile group. Repeat for each character in your group.

- You've done it! You've set up autologin!


Whenever you want to play, simply: Right-click MQ in the notification area --> Profiles --> (your group profile) --> Launch All Starred
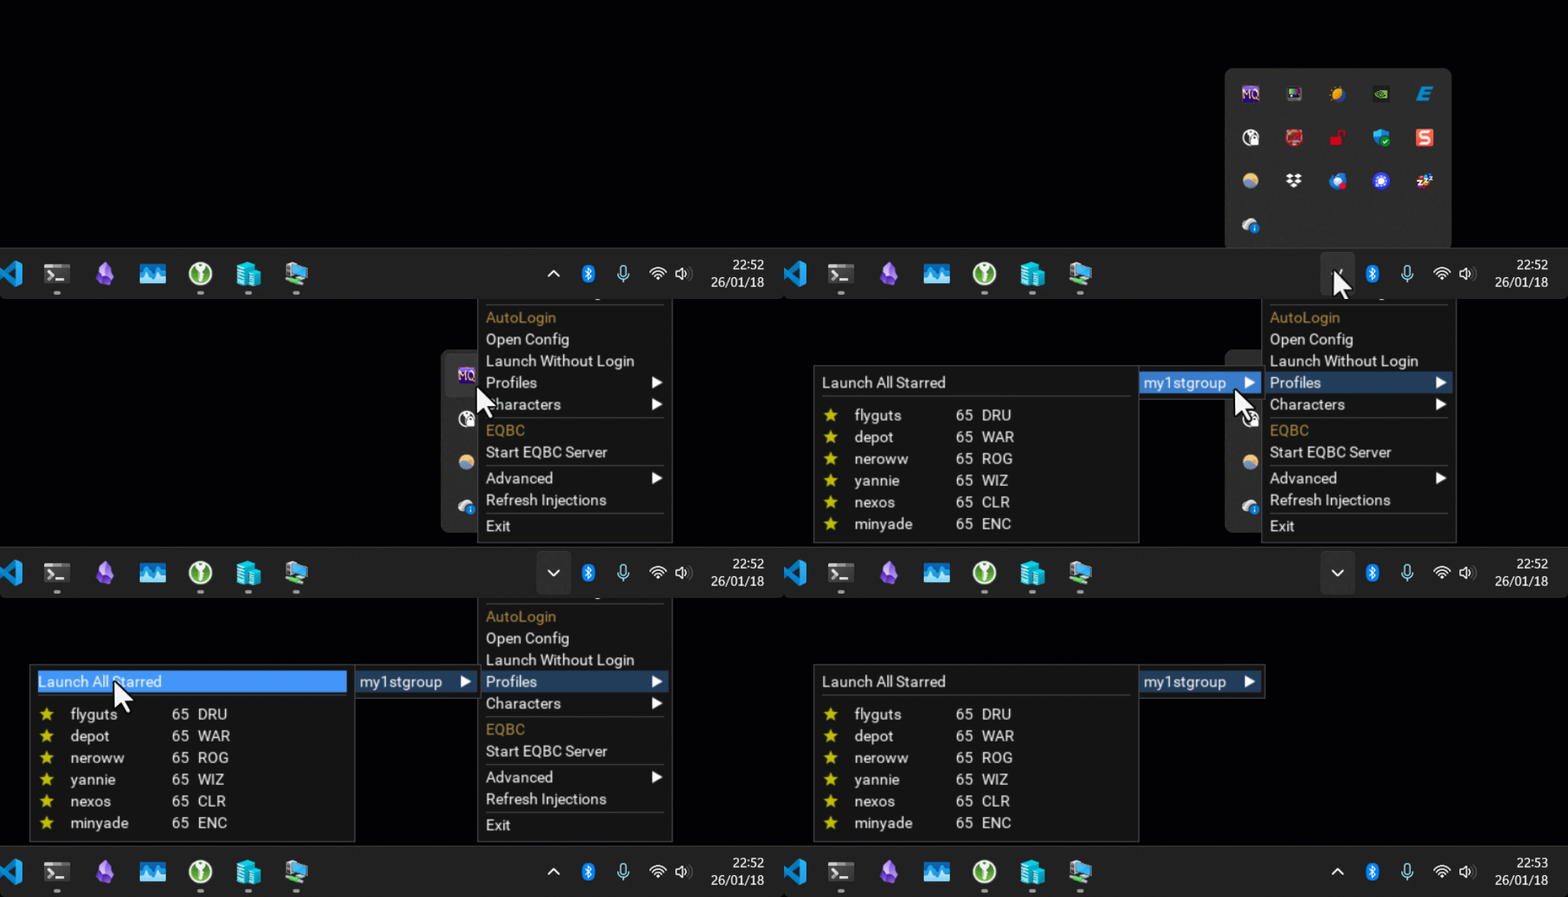
It's time to jump in-game and have some fun. Launch your profile that you set up in the last step, and explore some of these features:
- /who
An upgraded/whocommand is useful for many things, like finding worthy targets.

- A new item display
You can set loot filters on the item display, value and spell details are added as well.

- Map
Those dots on your new map are moving! Right-click to target.

- Find your targets
When you/mqtargetsomething, get pointed in the right direction with/face

- You'll often want to use
/yesand/no, which handle any yes/no popups your group receives.
- Fun with settings
The default/mqsettingsare fine for most people, but here are a couple fun ones:
Framelimiter will help lower your electric bill, even beyond the default limiter. Look at the fabulous CPU savings!

Your in-game map can be overwhelming at times, so it's nice to disable a few things:

Controlling your characters is most easily done through the DanNet commands
If I want all of my characters, including my driver (warrior!) to wave, I type,
View attachment dannet_wave.mp4
To make my cleric "Defne" cast Kazad's Mark,
View attachment dannet_cast.mp4
/dge (dannet group execute) and /dgae (dannet group all execute) For example, if I want my other characters to wave, I type,/dge /waveIf I want all of my characters, including my driver (warrior!) to wave, I type,
/dgae /waveView attachment dannet_wave.mp4
To make my cleric "Defne" cast Kazad's Mark,
/dex defne /cast Kazad's MarkView attachment dannet_cast.mp4
There are several pre-made channels, for example:
Will instruct all your casting classes to gate.
Will instruct all of your tanks to stop auto-attack.
For a full list of pre-made channels/groups, type
If you run more than six characters, you'll want to use
/dge caster /cast gateWill instruct all your casting classes to gate.
/dge tank /attack offWill instruct all of your tanks to stop auto-attack.
For a full list of pre-made channels/groups, type
/dnet infoIf you run more than six characters, you'll want to use
/dgge and /dggae for group-level control, as well as /djoin <name> save to create custom groups/channels.- Set up 1-click grouping.
We don't want your characters accepting invites and trades from just anyone, so it's best to automate such things only with those we trust. MQ2AutoAccept makes this simple,
/dgae/autoaccept on
/dgae /autoaccept add <name>
/dgae /autoaccept add <name>
... and so on
/dgae /autoaccept save

- The best way to invite everyone into a group is a good old fashion EverQuest social. Go ahead and create one,
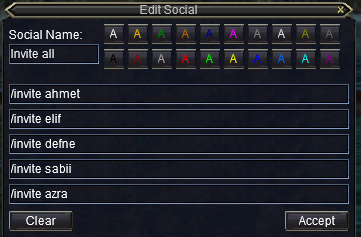
Now just click your social, and AutoAccept will handle the rest. You did it!

It can be nice to trust translocates and anchors as well
/dgae /autoaccept translocate on
/dgae /autoaccept anchor on
/dgae /autoaccept save
- You can now enjoy those buttons beneath your group window thanks to MQ2GroupInfo.
Come to me uses Nav to bring your group to you.
View attachment move_cometome.mp4
Follow me does what it sounds like,
View attachment move_followme.mp4
Mimic me is a speech repeater.

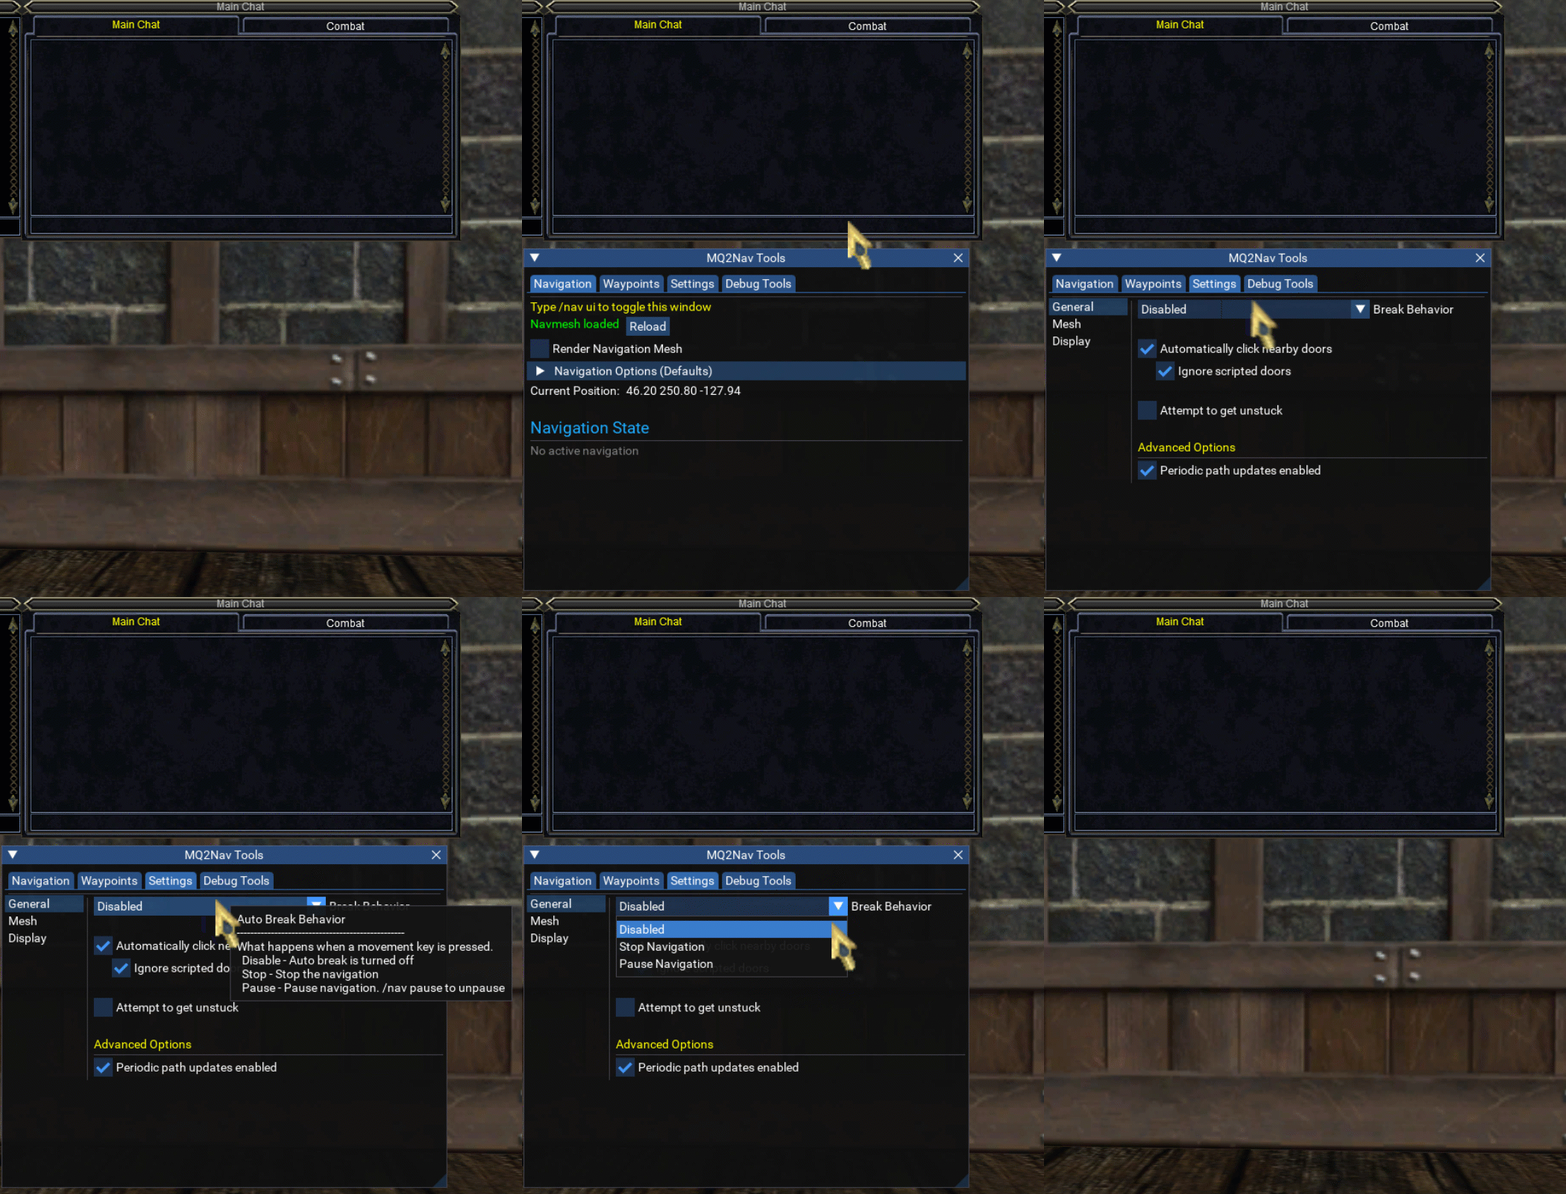
- MQ2Nav is the brains behind nearly all scripted movement, and you can use it directly as well.
/nav target- will take you to your target.
/nav stop- will stop you immediately.
View attachment nav_mqtarget.mp4
/nav spawnallows travel to all the possibilities of Spawn Search. For example, you can nav to the banker in any zone regardless of their name,
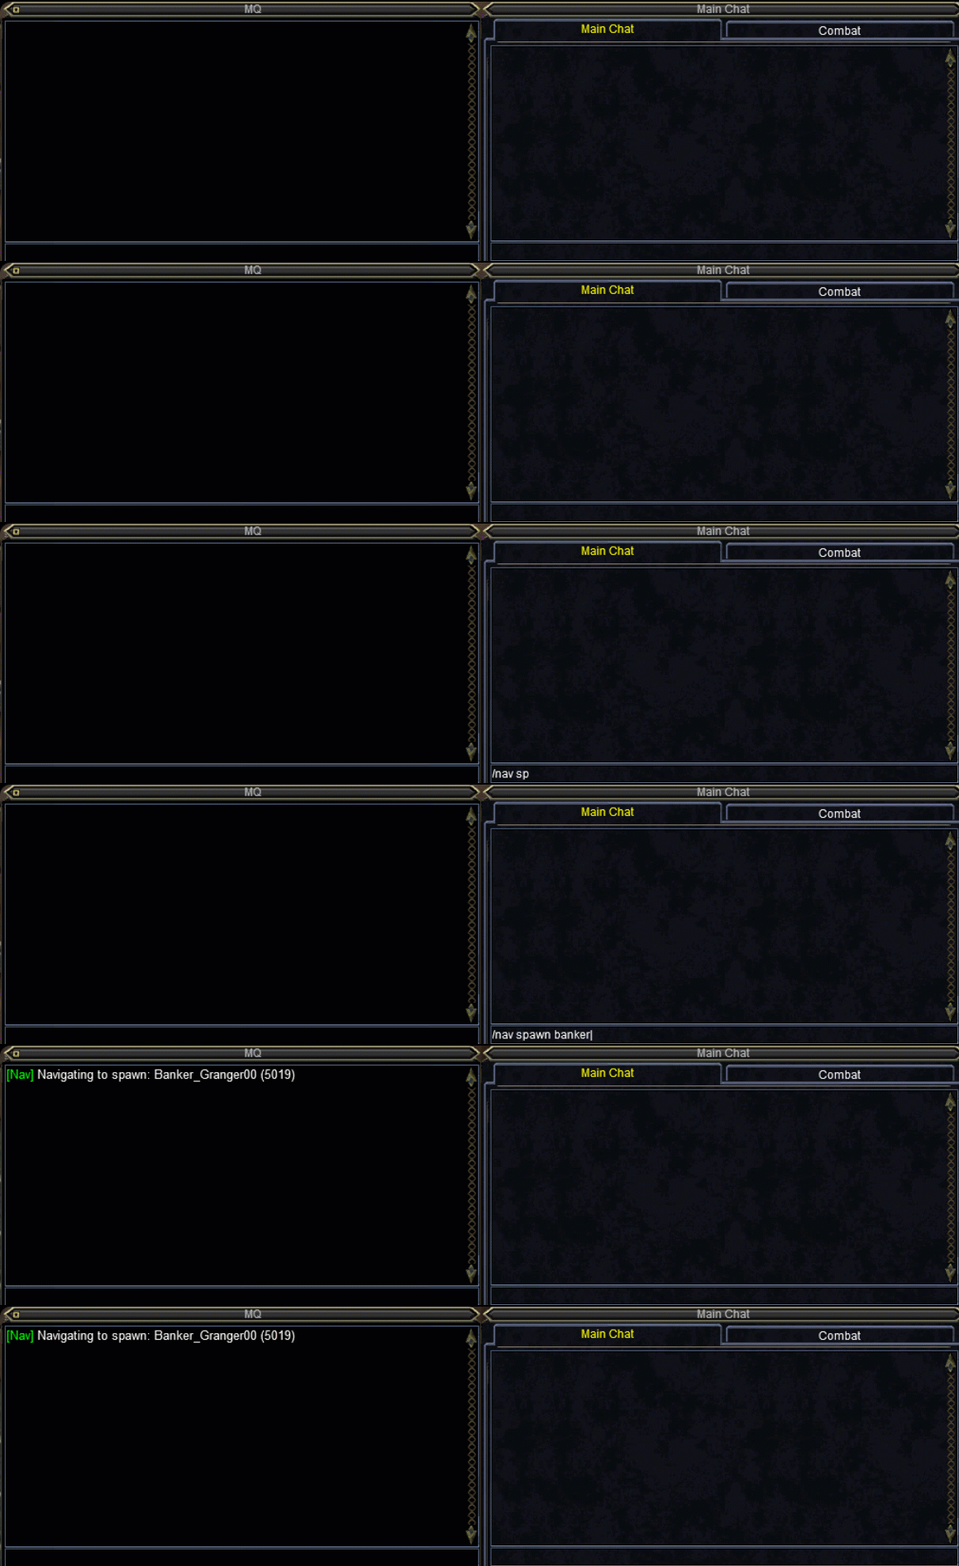
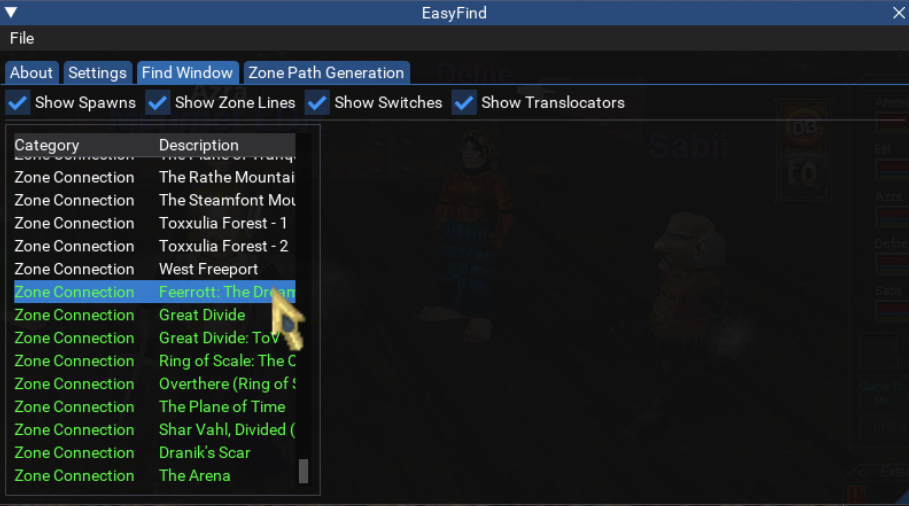
- The Find Window (CTRL + F) has a new feature thanks to MQ2EasyFind. CTRL + SHIFT + CLICK moves your whole group, and CTRL + CLICK moves you.
View attachment easyfind_findwindow.mp4
For a more powerful find window with filters, try
/easyfind ui
- TravelTo allows multi-zone travel, although there's no guarantee you'll survive the trip.
There several ways to access the ui (easyfind's zone tab, and even via EverQuest's atlas zone finder) but the command line is easiest for moving your team,
/travelto group zone name
View attachment travelto.mp4
There are pre-made scripts to get your team working together in battle, like the extremely configurable KissAssist, and even plugins like CWTN, but RGMercs is good one to start with.
RGMercs
RGMercs
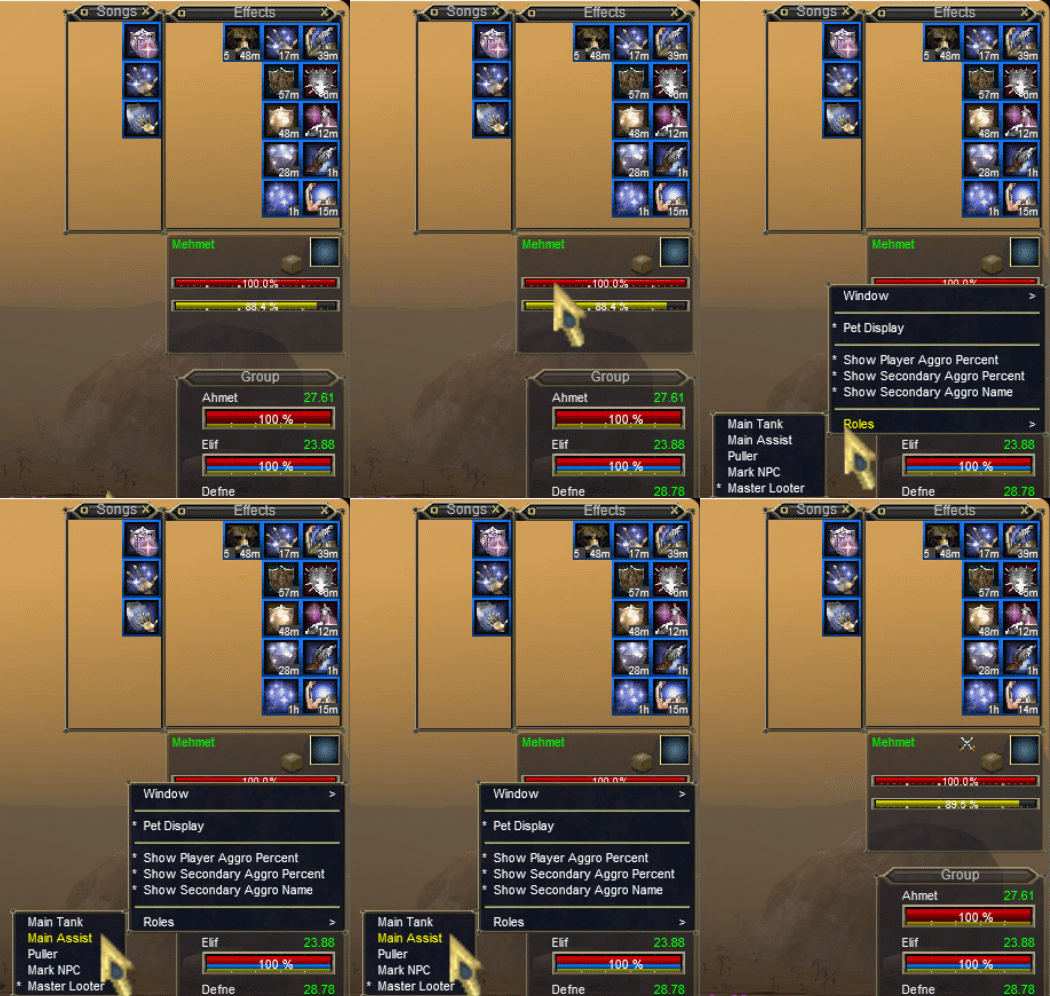
- Set a "main assist" in your group (if you run multiple groups, you'll need to use RGMerc's assist lists)
- Type
/lua run rgmercson one character to make sure you've got the requirements.

- If you don't have the requirements, you'll see this popup. Click "install"

- If everything seems good, you can stop the script by closing the RGMercs window, or by typing
/lua stop rgmercs

- From your driver (warrior) account, start RGMercs on your box group (but not yourself) with
/dge /lua run rgmercs
And tell your group to follow you around with,
/dge /rgl chaseon

Your boxed characters should now be following you around, and if you start a fight, they're going to back you up.
View attachment rgmercs.mp4
Obtaining and running other scripts
- Go to our resources section to find a script you'd like.
- "Watch" the resource.

- Then run redfetch and press the big blue "Easy Update",
- Get in-game. Open the Lua GUI from the EQ button, or simply type
/lua gui
Find the script's directory, and then theinit.luafile. Click ok.
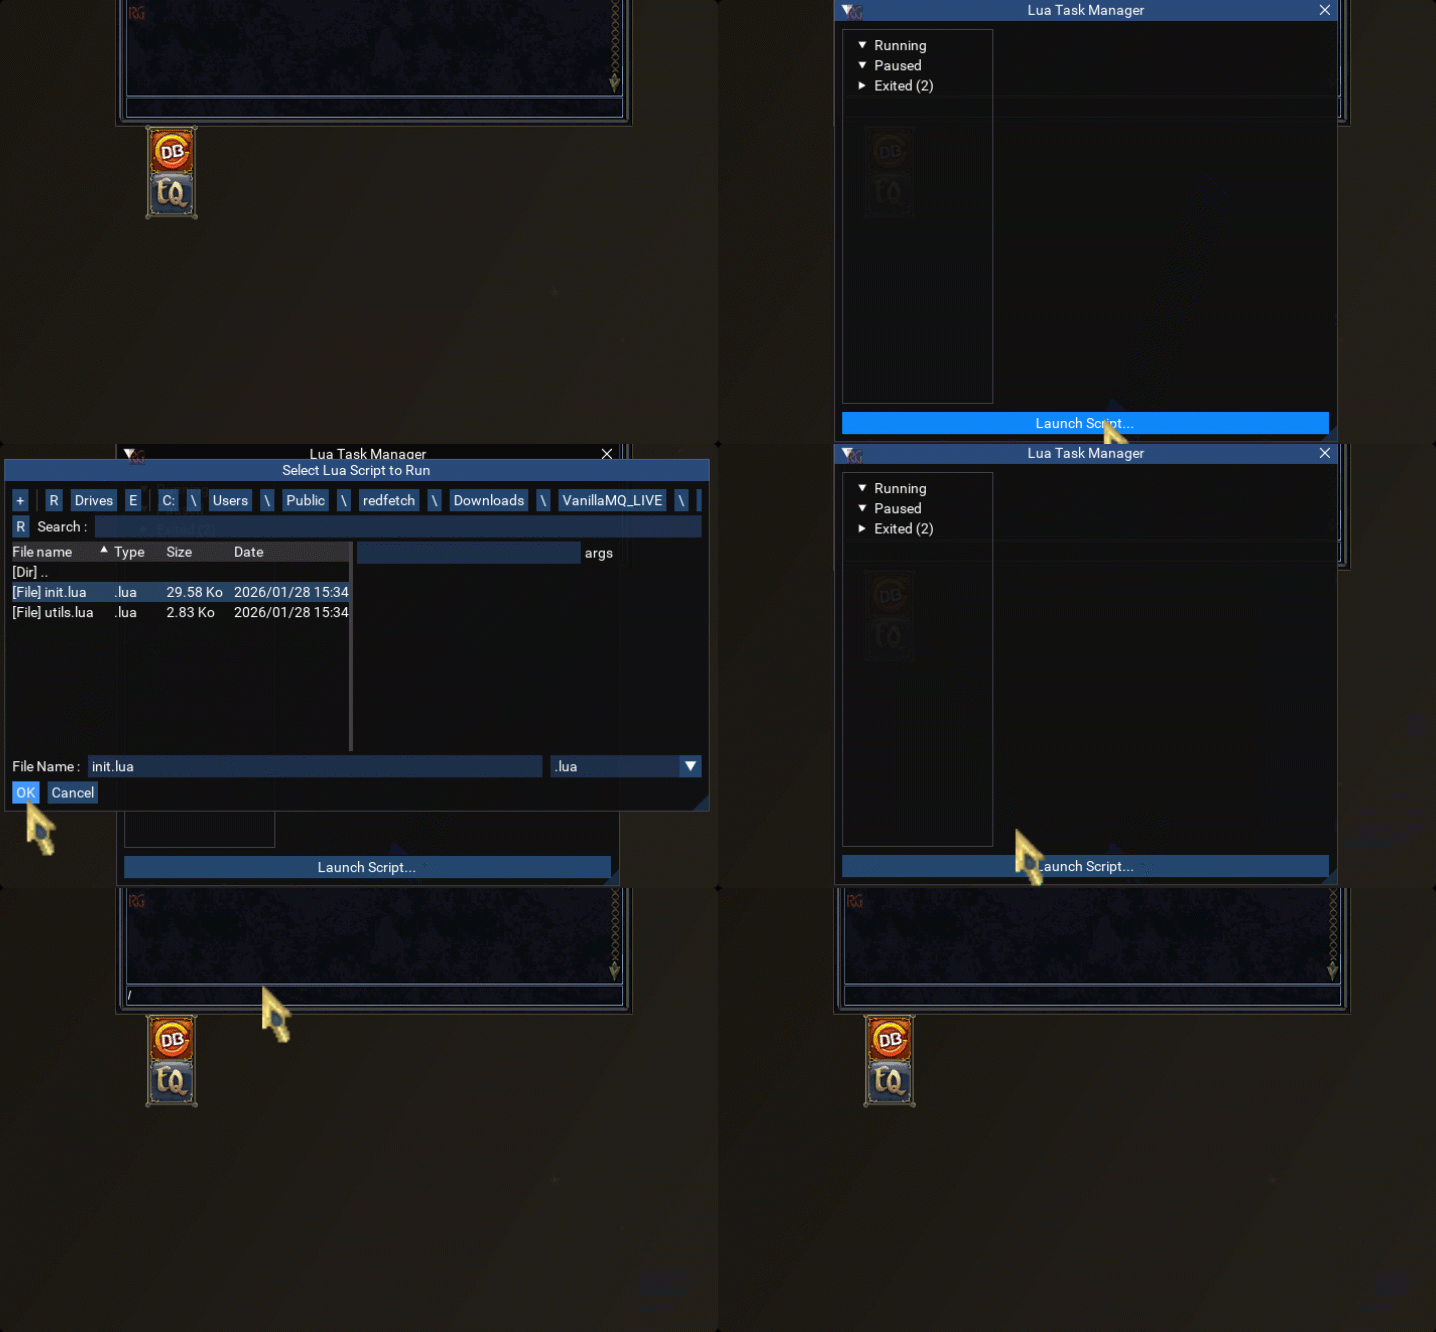
You're now running the script, huzzah!
I truly hope you enjoy this playstyle. The community has created something very special over the course of the last 20 years, completely organic, open and unique in online gaming. The only way to make your 6 box group more fun is to join an MQ-friendly guild, especially one that raids together. Ask around on the forums

Last edited: