Uh, welcome to 2016?!?!?
Ya, it's now 2018 and I still know people using the old methods. Or using an older method because they do not think it can be mixed with the newer (some would say propper) way. Some of the guides are wrong (not at their own fault, just due to progress). Some of the suggestions are, in my opinion, terrible. A quick google search on the subject doesn't improve things much either. So I'm attempting to gather all the data together on this plugin in a single place.
I've spent a lot of time researching the MQ2AutoLogin plugin and playing around with things. It is a really interesting plugin in my opinion and a bit different that the rest of the MQ2 plugins. Since I couldn't find many of these details documented I decided to write them down myself.
Maskoi had originally authored a really nice starting point, and I've expanded upon it a bit.
If you do something over and over and over again (uh, like logging in every day? you should automate it! It's the MQ way!
If you're not using this plugin yet, I urge you to take the information provided and use it. I've tried to document it as simply as possible, while still keeping the old and outdated information available if you (WHY? WHY? WHY?) should choose to use the old methods.
Please let me know where things are not clear or where improvements can be made. My goal is to expand on this over time to hopefully ensure there are no more questions related to MQ2AutoLogin. I know I sure had them when I started playing with this plugin.
I ask to keep discussion of the guide itself on this thread. But if you have MQ2AutoLogin questions, please use the "discussion thread" for those things.
Here's a redguides exclusive!
-orkim
0 Table of Contents
1 Overview
2 Setup
2.1 MQLogin Style
2.2 Session Style
2.3 Station Name Style
3 Usage via MacroQuest.exe
3.1 Adjusting Settings
3.2 Security Notices
4 Server Shortnames
4.1 Adding New/Custom Servers
4.2 Example Emu Servers
5 In-Game Commands
6 MQ2AutoLogin.ini Settings
7 Character Select Screen Key Bindings
8 Window Management
9 Technical Information
9.1 MacroQuest2.exe
9.2 MQ2AutoLogin
9.3 EverQuest.exe
9.4 eqgame.exe
9.5 Putting It All Together
10 Troubleshooting
11 Acknowledgments
12 Discussion
1 Overview
MQ2AutoLogin is a core MacroQuest2 plugin that automatically logs in your station account, server, and character.
Type "/plugin mq2autologin" in-game to load the plugin for the first time. It will be added to your macroquest.ini file and subsequently be loaded on all MacroQuest restarts. If you wish you can unload the plugin with a "/plugin mq2autologin unload" in-game. Finally, a "/plugin list" will show you all currently loaded plugins if you want to check if it is loaded.
There are 3 different methods to provide your login data to MQ2AutoLogin. They differ in the how your data is entered, read out to be used by MQ2AutoLogin, and how they are stored on disk.
1) MQ2Login Style (RECOMMENDED)
2) Session Style (OLD METHOD)
3) Station Name Style (OLD METHOD)
2 Setup
2.1 MQ2Login Style (RECOMMENDED)
2.1.1 Background
Using the MQ2Login style is secure, simple, easy.
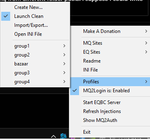
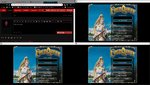
In 2016, the MacroQuest2.exe (tray application) and MQ2AutoLogin where updated to allow for a more secure storage of your login data. Using this method you are able to organize any number of characters through custom profiles ("profiles" can be thought of as "groups"). All of your characters will be organized and just one click away.​
I highly suggest that you use this style of storing your login data. I cannot think of any reason to use either of the other two styles (Session/Station Name). Anything the other methods can do can be done in a better way with the MQ2Login style.
2.1.2 Setup
Type "/plugin mq2autologin" in-game to load the plugin for the first time. It will be added to your macroquest.ini file and subsequently be loaded for all future logins.
Right-click the tray icon.
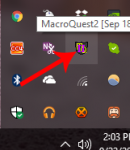
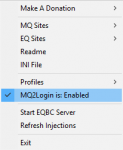
Make sure MQ2Login is enabled. If not, click it to enable.
Profiles -> Create New...
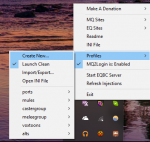
Fill in the information and save.
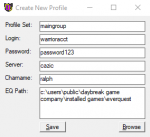
Profile Set - This is the "profile" name. It will be the name of the entry on the profiles menu when you go to load a toon/team. Likewise, this is the name of the section where the data will be stored in the MQ2AutoLogin.ini file.
Login - This is your Station Name.
Password - This is your Station Password.
Server - The *shortname* of the server for your toon.
Charname - The character name of your toon.
EQ Path - Directory where your eqgame.exe is located. Use the "Browse" button should you need to adjust the path.
Once filled out click save to store the changes in your MQ2AutoLogin.ini file.
Note: If you're entering a whole team, after clicking save just adjust the Login/Password/Charname to your next toon, and click save again. Repeat for each toon you wish to add to the profile. This makes it really quick to input your teams.
2.2 Session Style (OLD METHOD)
WARNING: The following method stores your account information in MQ2AutoLogin.ini in plain text. Nothing is gained by using this old method of storing/using your login data. HOWEVER, IF YOU DECIDE TO IGNORE THE RECCOMENDATION OF USING METHOD 1, NEVER SHARE OR POST YOUR MQ2AutoLogin.ini FILE!
These are just the minimum things you need to set to use Session Style. Be sure you are adding/editing the MQ2AutoLogin.ini file within the correct section. Section names begin with a section name inside of square brackets (for example "[Settings]"; without the quotes).
First, you'll need to set up the MQ2AutoLogin.ini file to include the following:
Yes, you will have a section actually named "[Session1]", "[Session2]", and so on until all are added. It is import to not skip any numbers.
If you decide to drop a character who is "[Session3]" you will need to adjust all the remaining sections down by 1. For example, "[Session4]" becomes "[Session3]" and so on until all higher sessions are renumbered.
At this point you may launch the game however you like. Use the normal launcher, use a batch file, launch it via the command prompt, or even the MacroQuest2.exe tray application.
The first window will use the settings from "[Session1]" section of the MQ2AutoLogin.ini file, the next window will use "[Session2]" settings, and so on.
If you launch more instances of eqgame.exe than you have defined in your MQ2AutoLogin.ini file, nothing will happen at the login screen and you may login manually.
2.3 Station Name Style (OLD METHOD)
WARNING: The following method stores your account information in MQ2AutoLogin.ini in plain text. Nothing is gained by using this old method of storing/using your login data. HOWEVER, IF YOU DECIDE TO IGNORE THE RECCOMENDATION OF USING METHOD 1, NEVER SHARE OR POST YOUR MQ2AutoLogin.ini FILE!
A different style of storing your login data is covered here.
These are just the minimum things you need to set to use Station Name Style. Be sure you are adding/editing the MQ2AutoLogin.ini file within the correct section. Section names begin with a section name inside of square brackets (for example "[Settings]"; without the quotes).
First, you'll need to set up the MQ2AutoLogin.ini file to include the following:
At this point you may launch the game however you like. Use the normal launcher, use a batch file, launch it via the command prompt, or even the MacroQuest2.exe tray application.
HOWEVER, you need to tell eqgame.exe your station name, so that your login information can be looked up in the MQ2AutoLogin.ini file. This is done via arguments to the eqgame.exe file when launched. The following is an example of how to pass this via arguments.
This style will limit you to only using a single character on each account. The first section that matches your Station Name will be the character that gets logged in. You can change the order in which they are listed to work around this limitation if you prefer.
3 Usage via MacroQuest.exe
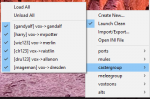
To login a single account, go to
Profiles -> <ProfileName>
and click the character name.
To login multiple accounts, go to
Profiles -> <ProfileName>
and click "Load All". All characters with a check-mark will be logged in.
3.1 Adjusting Settings
You can adjust which characters are active/inactive within a profile by right-clicking and select "Check" or "Uncheck".
You can edit an individual character by right-clicking on the desired character and selecting "Edit" within the profile menu.
You can delete an individual character by right-clicking on the desired character and selecing "Delete" within the profile menu.
3.2 Security Notices
Your login information (Station Name and Station Password) is encrypted and stored locally, unique to your computer. If you try to transfer the MQ2AutoLogin.ini between PCs, or change your PC's hardware, your login information will not be able to be read once on the destination PC. Be sure to use the import/export feature beforehand in those cases. I suggest you export your data as you make changes for backup purposes. The exported data is encrypted and protected by a password you choose at the time you export it. The data will be stored in a .mpd file which you can then transfer to another computer to import.
The profile name, server name, and character name will NOT be encrypted in the MQ2AutoLogin.ini file. You may or may not consider this a security issue. However it is important to disclose this for those who do not look at the contents of the file themselves. Be careful when sharing your MQ2AutoLogin.ini file with people.
If a person has physical access to your computer, they cn view your Station Name and Station Password by editing an entry. All security is out the door with physical access to your computer. Hopefully you trust anyone who can physically access your computer.
4 Server Shortnames
The short names for servers are listed below:
4.1 Adding New/Custom Servers
If you find that you need to add a server you may edit MQ2AutoLogin.ini directly. Add a "[Servers]" section (or edit if it already exists) to the file which resembles:
customname - This is the *short name* that you will use. The string after the equal sign is the full server name.
For example, here's how to add Brekt, go to
Profiles -> Open INI File
Add or edit the file to match the following:
4.2 Example Emu Servers
Here's an example server block for some emu servers:
Below are all the currently Legend/Recommended servers as of 9/27/2017
5 In-Game Commands
/switchserver <server short name> <character name> - when issued in-game, this will log you out of your current character and log you back in on the server and character specified
/switchcharacter <character name> - when issued in-game, this will log you out of your current character and log you back in with the character specified on the same server
/relog <#s|#m> - when issued in-game, this will relog you with the delay specified ("/relog 10s" - delays 10 seconds on the character select screen; "/relog 30m" - delays 30 minutes instead)
6 MQ2AutoLogin.ini Settings
UseMQ2Login - defaults to 1; This must be set to 1 if using the MQ2Login Style. This must be set to 0 if using the Session or Station Name styles.
UseStationNamesInsteadOfSessions - defaults to 0; This is only examined if UseMQ2Login (above) is set to 0. If disabled Session Style ini file will be used. If enabled Station Name style ini file will be used.
KickActiveCharacter - defaults to 1; If enabled, this clicks the "Yes" button when the window pops up asking if you want to kick the character that you already have logged into a world server. If disabled the auto login will stop when prompted.
7 Character Select Screen Key Bindings
Pressing the END key while on the character select screen will disable the auto login.
Pressing the HOME key while on the character select screen will enable the auto login.
8 Window Management
This isn't really part of MQ2AutoLogin but it seems to come up a lot around the subject of logging in and flipping though windows. This was added September 18, 2016 with the following entry in the Changes.txt file:
The code has been extended to support multiple modifiers with a hotkey. It was noted on March 11, 2018 with the following entry in the Changes.txt file:
In the redguides default macroquest.ini file both 'BossMode' and 'CycleNextWindow' are set to 0 (disabled).
9 Technical Information
NOTE: You can safely skip this section if you do not care much about the lower level details of how all these pieces tie together.
I have found it to be helpful to get into the details of how things fit together. This has helped me track down and document where things happen and how different components interact with one another.
One of the things to be certain you understand is all of the components that fit together to make the auto login function. Here are the highlights:
9.1 MacroQuest2.exe
This is the system tray program. It functions as a front-end component of MQ2AutoLogin. It allows for adding/editing/deleting of characters in a profile. Import/export of the data to a .mpd file for transport to another computer.
Once launched, it looks for any process called "eqgame.exe" in memory. Once found some integrity checks are performed against it, and it attempts to inject the MQ2 DLLs into it. This "wires" MQ2 into the everquest client.
If it is launched prior to eqgame.exe being in memory it will standby and monitor all new processes for a match and "do its job" everytime it finds one.
9.2 MQ2AutoLogin
One of the MQ2 DLLs. This, along with all of the other loaded MQ2 DLLs runs in the same process as the client. This code actually runs "inside" the eqgame.exe process. The code will have been injected by MacroQuest2.exe as it finds matching processes.
9.3 EverQuest.exe
This is the patcher. It allows you to view some news. It checks for and applies updates to the everquest client/data files. Once complete it will actually launch the client by creating a new process running eqgame.exe (below).
9.4 eqgame.exe
This is the everquest client itself. It has two notable arguments.
The first is "patchme" which causes the patch checks to be skipped.
The second is "/login:" which is a string that is passed along to automatically fill out the "Station Name" field once the client starts up.
9.5 Putting It All Together
- Use MacroQuest2.exe (the tray application) to add/edit/delete profiles and characters for MQ2AutoLogin. These are added to the MQ2AutoLogin.ini file.
- Launch eqgame.exe with arguments so it knows where to grab its login information.
We can launch eqgame.exe using ISBoxer/WinEQ2/batch file/command prompt/shortcut/etc. Whatever you wish. However, each one we launch we need to supply enough information that it can extract the data out of the MQ2AutoLogin.ini file to perform the login.
For example, assume we have a profile named "mains". Within this profile there are 2 characters "alice" and "bob". They both are on the Vox server. We would start two instances of eqgame.exe like so:
The above is exactly what the MacroQuest2.exe program does when you click on a character (or launches multiple processes when 'Load All' is selected).
Once the client gets to the Station Name/Password screen the 'Station Name' will be filled with 'mains_vox:alice' and 'mains_vox:bob'. Since we have the MQ2AutoLogin plugin running (you do, don't you?) it will be read in by the plugin and work begins to get the other data we need out of MQ2AutoLogin.ini.
The file will be decrypted, the station name and password will be retrieved. Finally we will delete the 'mains_vox:alice' or 'mains_vox:bob' strings out of the input boxes, replace them with the Station Name/Password and login. The server will then be selected. And finally the correct character will be selected.
You should be logged in an ready to play.
10 Troubleshooting
Q: When I launch a character/team it stops logging in on the Station Name/Pass with a weird "<profile>_<server>:<character>" string entered.
A: You don't actually have MQ2AutoLogin plugin loaded and it is not taking over the login process for you. Log in once manually and issue a "/plugin MQ2AutoLogin" to load it. Quit all instances of EverQuest and attempt to launch it again.
Q: When I launch a character/team it stops logging in on the Station Name/Pass with empty input boxes.
A: You're not launching the eqgame.exe process with the correct arguments. See the technical details section for more information.
11 Acknowledgments
Some of the material covered above was sourced form the RTFM/Plugin Guide located at https://www.redguides.com/community/threads/24878-MQ2AutoLogin and originally authored by Maskoi. Many people have contributed to the wiki since then and added changes. I've shamelessly reused the images from that guide.
The MQ2AutoLogin plugin lists ieatacid, eqmule, and derple as authors/maintainers/contributors. Thanks for your work on this plugin.
Since this was a fairly extensive rewrite in parts, and totally new addition of material in other parts, I have elected to post it here for now. Once the content is cleaned up, proofed, and anything extended which might need to be, I plan on adding this data back to the wiki.
Some material was sourced from the following locations:
* https://www.redguides.com/community/threads/24878-MQ2AutoLogin
* https://www.redguides.com/community/threads/43323-MQ2AutoLogin
* https://www.redguides.com/community...ogin-to-EQ-on-multiple-accounts-with-one-step
* https://www.redguides.com/community/threads/29639-Automate-login-for-multiple-accounts
* https://github.com/ieatacid/MQ2AutoLogin
* The VeryVanila compile source (no link available).
12 Discussion
To discuss and troubleshoot MQ2AutoLogin, see this thread:
http://www.redguides.com/community/showthread.php/43323-MQ2AutoLogin
Ya, it's now 2018 and I still know people using the old methods. Or using an older method because they do not think it can be mixed with the newer (some would say propper) way. Some of the guides are wrong (not at their own fault, just due to progress). Some of the suggestions are, in my opinion, terrible. A quick google search on the subject doesn't improve things much either. So I'm attempting to gather all the data together on this plugin in a single place.
I've spent a lot of time researching the MQ2AutoLogin plugin and playing around with things. It is a really interesting plugin in my opinion and a bit different that the rest of the MQ2 plugins. Since I couldn't find many of these details documented I decided to write them down myself.
Maskoi had originally authored a really nice starting point, and I've expanded upon it a bit.
If you do something over and over and over again (uh, like logging in every day?
you should automate it! It's the MQ way!If you're not using this plugin yet, I urge you to take the information provided and use it. I've tried to document it as simply as possible, while still keeping the old and outdated information available if you (WHY? WHY? WHY?) should choose to use the old methods.
Please let me know where things are not clear or where improvements can be made. My goal is to expand on this over time to hopefully ensure there are no more questions related to MQ2AutoLogin. I know I sure had them when I started playing with this plugin.
I ask to keep discussion of the guide itself on this thread. But if you have MQ2AutoLogin questions, please use the "discussion thread" for those things.
Here's a redguides exclusive!
-orkim
0 Table of Contents
1 Overview
2 Setup
2.1 MQLogin Style
2.2 Session Style
2.3 Station Name Style
3 Usage via MacroQuest.exe
3.1 Adjusting Settings
3.2 Security Notices
4 Server Shortnames
4.1 Adding New/Custom Servers
4.2 Example Emu Servers
5 In-Game Commands
6 MQ2AutoLogin.ini Settings
7 Character Select Screen Key Bindings
8 Window Management
9 Technical Information
9.1 MacroQuest2.exe
9.2 MQ2AutoLogin
9.3 EverQuest.exe
9.4 eqgame.exe
9.5 Putting It All Together
10 Troubleshooting
11 Acknowledgments
12 Discussion
1 Overview
MQ2AutoLogin is a core MacroQuest2 plugin that automatically logs in your station account, server, and character.
Type "/plugin mq2autologin" in-game to load the plugin for the first time. It will be added to your macroquest.ini file and subsequently be loaded on all MacroQuest restarts. If you wish you can unload the plugin with a "/plugin mq2autologin unload" in-game. Finally, a "/plugin list" will show you all currently loaded plugins if you want to check if it is loaded.
There are 3 different methods to provide your login data to MQ2AutoLogin. They differ in the how your data is entered, read out to be used by MQ2AutoLogin, and how they are stored on disk.
1) MQ2Login Style (RECOMMENDED)
2) Session Style (OLD METHOD)
3) Station Name Style (OLD METHOD)
2 Setup
2.1 MQ2Login Style (RECOMMENDED)
2.1.1 Background
Using the MQ2Login style is secure, simple, easy.
In 2016, the MacroQuest2.exe (tray application) and MQ2AutoLogin where updated to allow for a more secure storage of your login data. Using this method you are able to organize any number of characters through custom profiles ("profiles" can be thought of as "groups"). All of your characters will be organized and just one click away.​
I highly suggest that you use this style of storing your login data. I cannot think of any reason to use either of the other two styles (Session/Station Name). Anything the other methods can do can be done in a better way with the MQ2Login style.
2.1.2 Setup
Type "/plugin mq2autologin" in-game to load the plugin for the first time. It will be added to your macroquest.ini file and subsequently be loaded for all future logins.
Right-click the tray icon.
Make sure MQ2Login is enabled. If not, click it to enable.
Profiles -> Create New...
Fill in the information and save.
Profile Set - This is the "profile" name. It will be the name of the entry on the profiles menu when you go to load a toon/team. Likewise, this is the name of the section where the data will be stored in the MQ2AutoLogin.ini file.
Login - This is your Station Name.
Password - This is your Station Password.
Server - The *shortname* of the server for your toon.
Charname - The character name of your toon.
EQ Path - Directory where your eqgame.exe is located. Use the "Browse" button should you need to adjust the path.
Once filled out click save to store the changes in your MQ2AutoLogin.ini file.
Note: If you're entering a whole team, after clicking save just adjust the Login/Password/Charname to your next toon, and click save again. Repeat for each toon you wish to add to the profile. This makes it really quick to input your teams.
2.2 Session Style (OLD METHOD)
WARNING: The following method stores your account information in MQ2AutoLogin.ini in plain text. Nothing is gained by using this old method of storing/using your login data. HOWEVER, IF YOU DECIDE TO IGNORE THE RECCOMENDATION OF USING METHOD 1, NEVER SHARE OR POST YOUR MQ2AutoLogin.ini FILE!
These are just the minimum things you need to set to use Session Style. Be sure you are adding/editing the MQ2AutoLogin.ini file within the correct section. Section names begin with a section name inside of square brackets (for example "[Settings]"; without the quotes).
First, you'll need to set up the MQ2AutoLogin.ini file to include the following:
Rich (BB code):
[Settings]
# Must be disabled.
UseMQ2Login=0
# NOTE: The following line is optional, as it defaults to off.  However, it cannot be set to 1 to use sessions.
UseStationNamesInsteadOfSessions=0

[Session1]
StationName=<Your Station Name>
Password=<Your Station Password>
Server=<Server Short Name>
Character=<Character Name>

[Session2]
StationName=<Your Station Name>
Password=<Your Station Password>
Server=<Server Short Name>
Character=<Character Name>
Yes, you will have a section actually named "[Session1]", "[Session2]", and so on until all are added. It is import to not skip any numbers.
If you decide to drop a character who is "[Session3]" you will need to adjust all the remaining sections down by 1. For example, "[Session4]" becomes "[Session3]" and so on until all higher sessions are renumbered.
At this point you may launch the game however you like. Use the normal launcher, use a batch file, launch it via the command prompt, or even the MacroQuest2.exe tray application.
The first window will use the settings from "[Session1]" section of the MQ2AutoLogin.ini file, the next window will use "[Session2]" settings, and so on.
If you launch more instances of eqgame.exe than you have defined in your MQ2AutoLogin.ini file, nothing will happen at the login screen and you may login manually.
2.3 Station Name Style (OLD METHOD)
WARNING: The following method stores your account information in MQ2AutoLogin.ini in plain text. Nothing is gained by using this old method of storing/using your login data. HOWEVER, IF YOU DECIDE TO IGNORE THE RECCOMENDATION OF USING METHOD 1, NEVER SHARE OR POST YOUR MQ2AutoLogin.ini FILE!
A different style of storing your login data is covered here.
These are just the minimum things you need to set to use Station Name Style. Be sure you are adding/editing the MQ2AutoLogin.ini file within the correct section. Section names begin with a section name inside of square brackets (for example "[Settings]"; without the quotes).
First, you'll need to set up the MQ2AutoLogin.ini file to include the following:
Rich (BB code):
[Settings]
# Must be disabled.
UseMQ2Login=0
# Must be enabled.
UseStationNamesInsteadOfSessions=1

[<Your Station Name>]
Password=<Your Station Password>
Server=<Server Short Name>
Character=<Character Name>
At this point you may launch the game however you like. Use the normal launcher, use a batch file, launch it via the command prompt, or even the MacroQuest2.exe tray application.
HOWEVER, you need to tell eqgame.exe your station name, so that your login information can be looked up in the MQ2AutoLogin.ini file. This is done via arguments to the eqgame.exe file when launched. The following is an example of how to pass this via arguments.
Rich (BB code):
C:\EverQuest\eqgame.exe patchme /login:<Your Station Name>This style will limit you to only using a single character on each account. The first section that matches your Station Name will be the character that gets logged in. You can change the order in which they are listed to work around this limitation if you prefer.
3 Usage via MacroQuest.exe
To login a single account, go to
Profiles -> <ProfileName>
and click the character name.
To login multiple accounts, go to
Profiles -> <ProfileName>
and click "Load All". All characters with a check-mark will be logged in.
3.1 Adjusting Settings
You can adjust which characters are active/inactive within a profile by right-clicking and select "Check" or "Uncheck".
You can edit an individual character by right-clicking on the desired character and selecting "Edit" within the profile menu.
You can delete an individual character by right-clicking on the desired character and selecing "Delete" within the profile menu.
3.2 Security Notices
Your login information (Station Name and Station Password) is encrypted and stored locally, unique to your computer. If you try to transfer the MQ2AutoLogin.ini between PCs, or change your PC's hardware, your login information will not be able to be read once on the destination PC. Be sure to use the import/export feature beforehand in those cases. I suggest you export your data as you make changes for backup purposes. The exported data is encrypted and protected by a password you choose at the time you export it. The data will be stored in a .mpd file which you can then transfer to another computer to import.
The profile name, server name, and character name will NOT be encrypted in the MQ2AutoLogin.ini file. You may or may not consider this a security issue. However it is important to disclose this for those who do not look at the contents of the file themselves. Be careful when sharing your MQ2AutoLogin.ini file with people.
If a person has physical access to your computer, they cn view your Station Name and Station Password by editing an entry. All security is out the door with physical access to your computer. Hopefully you trust anyone who can physically access your computer.
4 Server Shortnames
The short names for servers are listed below:
Rich (BB code):
antonius
bertox
beta
bristle
cazic
drinal
erollisi
fippy
firiona
lockjaw
luclin
mayong
povar
ragefire
rathe
test
trakanon
tunare
vox
vulak
xegony
zek
4.1 Adding New/Custom Servers
If you find that you need to add a server you may edit MQ2AutoLogin.ini directly. Add a "[Servers]" section (or edit if it already exists) to the file which resembles:
Rich (BB code):
[Servers]
customname=Exact name
customname2=Exact Emu Server Name
customname - This is the *short name* that you will use. The string after the equal sign is the full server name.
For example, here's how to add Brekt, go to
Profiles -> Open INI File
Add or edit the file to match the following:
Rich (BB code):
[Servers]
brekt=Brekt (Free Trade)
4.2 Example Emu Servers
Here's an example server block for some emu servers:
Below are all the currently Legend/Recommended servers as of 9/27/2017
Rich (BB code):
[Servers]
peqgrand=[] [PEQ] The Grand Creation - Omens of War
ezserver=[] EZ Server - Custom Zones, Vendors, Quests, Items, etc
stormhaven=[] Storm Haven - High-Quality Custom Content
alkabor=[] The Al'Kabor Project [www.takproject.net]
thf=[] The Hidden Forest [ www.thehiddenforest.org ]
chronicles=[] Chronicles of Norrath
dragonsoul=[] Dragon Soul - CEQ [zh-cn/legit/PvE]
leetsauce=[] Leetsauce Productions
kmra=[] Raid Addicts (Fully Custom) [Solo/Group/Raid]
scorpious=[] Scorpious2k: The Next Generation [custom]
sod=[] Shards of Dalaya
vegarlson=[] Vegarlson Asylum
zek=[] Zek [Teams/Guildwars]
5 In-Game Commands
/switchserver <server short name> <character name> - when issued in-game, this will log you out of your current character and log you back in on the server and character specified
/switchcharacter <character name> - when issued in-game, this will log you out of your current character and log you back in with the character specified on the same server
/relog <#s|#m> - when issued in-game, this will relog you with the delay specified ("/relog 10s" - delays 10 seconds on the character select screen; "/relog 30m" - delays 30 minutes instead)
6 MQ2AutoLogin.ini Settings
UseMQ2Login - defaults to 1; This must be set to 1 if using the MQ2Login Style. This must be set to 0 if using the Session or Station Name styles.
UseStationNamesInsteadOfSessions - defaults to 0; This is only examined if UseMQ2Login (above) is set to 0. If disabled Session Style ini file will be used. If enabled Station Name style ini file will be used.
KickActiveCharacter - defaults to 1; If enabled, this clicks the "Yes" button when the window pops up asking if you want to kick the character that you already have logged into a world server. If disabled the auto login will stop when prompted.
7 Character Select Screen Key Bindings
Pressing the END key while on the character select screen will disable the auto login.
Pressing the HOME key while on the character select screen will enable the auto login.
8 Window Management
This isn't really part of MQ2AutoLogin but it seems to come up a lot around the subject of logging in and flipping though windows. This was added September 18, 2016 with the following entry in the Changes.txt file:
Rich (BB code):
18 Sep 2016 by eqmule
Sunday is funday... so here is some fluff:
- Added a "Boss Mode" hotkey, alt+~, (alt+tilde) if u click that all your eq windows will be instantly hidden. It's a toggle.
  the hotkey can be changed in the [MacroQuest] section, the value is called BossMode=
  setting BossMode=0 disables it.
- You can now "cycle" eq windows now with the '~' key.... (also known as tilde)
  its not obvious but you CAN change it by editing the macroquest.ini
  in the [MacroQuest] section add a CycleNextWindow=somekey
  Example: (and this is what it defaults to when this entry does not exist)
           CycleNextWindow=shift+`
  u can do alt+ and ctrl+ as well but thats it.
  you cannot combine alt+shift+, i didnt want to make this to complex.
  you CAN however drop the prefixes altogether and just specify it as
  CycleNextWindow=b
  that would make the lettere "b" on your keyboard cycle the windows... (not recommended unless u plan on never using the letter b for any other reason...)
  Setting CycleNextWindow=0 will disable it completely.
The code has been extended to support multiple modifiers with a hotkey. It was noted on March 11, 2018 with the following entry in the Changes.txt file:
Rich (BB code):
Mar 11 2018 by SwiftyMUSE
- Updated hotkey processing. You are now able to use any/all of the allowed modifiers win/alt/ctrl/shift keys.
  hotkey processing will allow characters `/~, 0-9, A-Z, NUMPAD0-9 as the keycode. For example, you might want
  win+ctrl+~ to be a valid hotkey.
  F12 is RESERVED for the debugger and can not be used as a hotkey. You can use F12 with a modifier.
In the redguides default macroquest.ini file both 'BossMode' and 'CycleNextWindow' are set to 0 (disabled).
9 Technical Information
NOTE: You can safely skip this section if you do not care much about the lower level details of how all these pieces tie together.
I have found it to be helpful to get into the details of how things fit together. This has helped me track down and document where things happen and how different components interact with one another.
One of the things to be certain you understand is all of the components that fit together to make the auto login function. Here are the highlights:
9.1 MacroQuest2.exe
This is the system tray program. It functions as a front-end component of MQ2AutoLogin. It allows for adding/editing/deleting of characters in a profile. Import/export of the data to a .mpd file for transport to another computer.
Once launched, it looks for any process called "eqgame.exe" in memory. Once found some integrity checks are performed against it, and it attempts to inject the MQ2 DLLs into it. This "wires" MQ2 into the everquest client.
If it is launched prior to eqgame.exe being in memory it will standby and monitor all new processes for a match and "do its job" everytime it finds one.
9.2 MQ2AutoLogin
One of the MQ2 DLLs. This, along with all of the other loaded MQ2 DLLs runs in the same process as the client. This code actually runs "inside" the eqgame.exe process. The code will have been injected by MacroQuest2.exe as it finds matching processes.
9.3 EverQuest.exe
This is the patcher. It allows you to view some news. It checks for and applies updates to the everquest client/data files. Once complete it will actually launch the client by creating a new process running eqgame.exe (below).
9.4 eqgame.exe
This is the everquest client itself. It has two notable arguments.
The first is "patchme" which causes the patch checks to be skipped.
The second is "/login:" which is a string that is passed along to automatically fill out the "Station Name" field once the client starts up.
9.5 Putting It All Together
- Use MacroQuest2.exe (the tray application) to add/edit/delete profiles and characters for MQ2AutoLogin. These are added to the MQ2AutoLogin.ini file.
- Launch eqgame.exe with arguments so it knows where to grab its login information.
Rich (BB code):
C:\EverQuest\eqgame.exe patchme /login:<profile>_<server short name>:<character name>We can launch eqgame.exe using ISBoxer/WinEQ2/batch file/command prompt/shortcut/etc. Whatever you wish. However, each one we launch we need to supply enough information that it can extract the data out of the MQ2AutoLogin.ini file to perform the login.
For example, assume we have a profile named "mains". Within this profile there are 2 characters "alice" and "bob". They both are on the Vox server. We would start two instances of eqgame.exe like so:
Rich (BB code):
C:\EverQuest\eqgame.exe patchme /login:mains_vox:alice
Rich (BB code):
C:\EverQuest\eqgame.exe patchme /login:mains_vox:bobThe above is exactly what the MacroQuest2.exe program does when you click on a character (or launches multiple processes when 'Load All' is selected).
Once the client gets to the Station Name/Password screen the 'Station Name' will be filled with 'mains_vox:alice' and 'mains_vox:bob'. Since we have the MQ2AutoLogin plugin running (you do, don't you?) it will be read in by the plugin and work begins to get the other data we need out of MQ2AutoLogin.ini.
The file will be decrypted, the station name and password will be retrieved. Finally we will delete the 'mains_vox:alice' or 'mains_vox:bob' strings out of the input boxes, replace them with the Station Name/Password and login. The server will then be selected. And finally the correct character will be selected.
You should be logged in an ready to play.
10 Troubleshooting
Q: When I launch a character/team it stops logging in on the Station Name/Pass with a weird "<profile>_<server>:<character>" string entered.
A: You don't actually have MQ2AutoLogin plugin loaded and it is not taking over the login process for you. Log in once manually and issue a "/plugin MQ2AutoLogin" to load it. Quit all instances of EverQuest and attempt to launch it again.
Q: When I launch a character/team it stops logging in on the Station Name/Pass with empty input boxes.
A: You're not launching the eqgame.exe process with the correct arguments. See the technical details section for more information.
11 Acknowledgments
Some of the material covered above was sourced form the RTFM/Plugin Guide located at https://www.redguides.com/community/threads/24878-MQ2AutoLogin and originally authored by Maskoi. Many people have contributed to the wiki since then and added changes. I've shamelessly reused the images from that guide.
The MQ2AutoLogin plugin lists ieatacid, eqmule, and derple as authors/maintainers/contributors. Thanks for your work on this plugin.
Since this was a fairly extensive rewrite in parts, and totally new addition of material in other parts, I have elected to post it here for now. Once the content is cleaned up, proofed, and anything extended which might need to be, I plan on adding this data back to the wiki.
Some material was sourced from the following locations:
* https://www.redguides.com/community/threads/24878-MQ2AutoLogin
* https://www.redguides.com/community/threads/43323-MQ2AutoLogin
* https://www.redguides.com/community...ogin-to-EQ-on-multiple-accounts-with-one-step
* https://www.redguides.com/community/threads/29639-Automate-login-for-multiple-accounts
* https://github.com/ieatacid/MQ2AutoLogin
* The VeryVanila compile source (no link available).
12 Discussion
To discuss and troubleshoot MQ2AutoLogin, see this thread:
http://www.redguides.com/community/showthread.php/43323-MQ2AutoLogin
Last edited:
 Haven't read it yet but will try to get to it sometime this weekend.