

THIS IS A WORK IN PROGRESS, I WILL BE UPDATING WITH IN-GAME SCREENSHOTS
First off, I want to say that this is my first "significant" post on RedGuides and I welcome constructive criticism (send a PM). I've surfed around a good bit and noticed the wiki was missing a lot of information regarding ToV. This is all from my personal experience and I'm going to be heavily relying on EQResource and RaidLoot for the information contained in this "guide."
A few things to consider before we jump into things:
LOOT CAMPS BY ZONE:
Eastern Wastes -
EW Named Overview
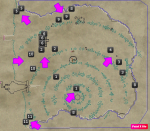
Most of the camps in EW can give you access to multiple named, the key is positioning yourself so that your puller is in range of PHs. Coldears and Cadane are a perfect example (far east side, near Iceclad bridge), you can effectively pull PHs for both of them from very safe spots along the ice crown. EW is also one of the zones where it is very easy to get access to picks, so always be on the lookout for that. I have noticed that if you're camping returned/Servant, that the dracos can be wonky with hitboxes and you may want to adjust camp size on boxes.
The Great Divide -
GD Named Overview
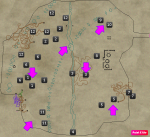
Much like EW, GD provides you with multiple camps that have easy/safe access to multiple named in a single camp and again, as a high traffic zone, usually some picks. I'd avoid the southeast side of the zone, as the cave and Laima are probably for lesson groups in raid gear. GD also has a lot of mobs fairly spread out, so you can tinker with your pull radius pretty freely.
Crystal Caverns -
CC Named Overview
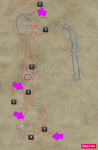
CC is my favorite T1 ToV zone, with the southern camp near Crystal Grinder's spawn being reminiscent of MPG for me. From there, you can pull north towards Life Leech, west towards the named geonid, and south for named spiders/another Life Leech spawn.
Kael Drakkel -
KD Named Overview
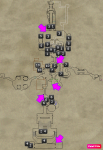
Add live giants to ignore list, they will assist in some of the camps so be aware of that and watch AE settings.
Velketor's Labyrinth -
Velks Named Overview
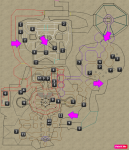
Starting with the top left and going clockwise, I camp devourer on the little platform down the ramp from PHs, tarantula in the wandering arachnid room on first floor, kobolds on either side of their room, and a few different named off the side from the little gazebo where the mission starts. I don't mess with the basement since it's too much of a hassle (risk vs reward is WAY skewed), and the other named I don't really have ideal camps for - I just hit them after the server resets since those are so common right now.
EXP CAMPS BY ZONE:
Not going to put too much effort into this section, as I feel when I'm going for purely XP loot and such is irrelevant for me. My top few choices include:
Velium Infused Pelts -
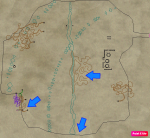
I feel GD is the best place to farm them quickly, although you could also go to Kael or EW. Going for the kodiaks in the south and southeast, or the wurm cave towards the center of the zone gives you good access to these.
Velium Infused Spider Silks -
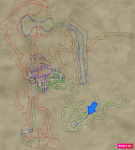
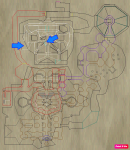
Either CC or Velks are your best options, CC is relatively easy and I think the southeast part of the zone is by far the most consistent. You could also go over by Queen spawn, but there aren't as many spiders. Velks is definitely a better source, but will be slightly harder, either the ground floor "3-way" where tarantula spawns or higher up the ramps, just under devourer.
Raw Velium Ore -
Ry'gorr Mines (dead side by where Inspector spawns)
Great Divide (NW by Thosgromri, SE tunnels, at forgotten raid leader, or by Squire camp)
Eastern Wastes (the coldain huts, giant fort, or in SE part of zone killing goblins and other random crap)
SUGGESTED GEARING PATH:
This will not be absolute "best in slot" but an effort to gear as efficiently as possible.
Melee Group:
Caster group:
A small disclaimer and my personal views on gear priority:
While I have an extensive background in competitive gaming (pushing content, MMOs, etc.), I am by no means an expert and some of the following is mostly based on anecdotal evidence with minimal data to support it.
Gear priority: Tank primary/secondary > tank belt (cripple > slow if you have enc/shm/bst), and then at this point the gearing breaks off depending on group makeup...
CREDIT FOR CONTRIBUTORS:
First off, I want to say that this is my first "significant" post on RedGuides and I welcome constructive criticism (send a PM). I've surfed around a good bit and noticed the wiki was missing a lot of information regarding ToV. This is all from my personal experience and I'm going to be heavily relying on EQResource and RaidLoot for the information contained in this "guide."
A few things to consider before we jump into things:
- Always know your group's capability and adjust settings accordingly, some camps have multiple named around them and difficulty varies. In order to "hold" the camp or keep the puller safe, adjust PullRadius to keep a semi-clear path around where you set up.
- I always take time to go through and blacklist quest mobs or things that may interfere with my puller (like Froo Froo in EW), I strongly recommend doing the same.
LOOT CAMPS BY ZONE:
Eastern Wastes -
EW Named Overview
Most of the camps in EW can give you access to multiple named, the key is positioning yourself so that your puller is in range of PHs. Coldears and Cadane are a perfect example (far east side, near Iceclad bridge), you can effectively pull PHs for both of them from very safe spots along the ice crown. EW is also one of the zones where it is very easy to get access to picks, so always be on the lookout for that. I have noticed that if you're camping returned/Servant, that the dracos can be wonky with hitboxes and you may want to adjust camp size on boxes.
The Great Divide -
GD Named Overview
Much like EW, GD provides you with multiple camps that have easy/safe access to multiple named in a single camp and again, as a high traffic zone, usually some picks. I'd avoid the southeast side of the zone, as the cave and Laima are probably for lesson groups in raid gear. GD also has a lot of mobs fairly spread out, so you can tinker with your pull radius pretty freely.
Crystal Caverns -
CC Named Overview
CC is my favorite T1 ToV zone, with the southern camp near Crystal Grinder's spawn being reminiscent of MPG for me. From there, you can pull north towards Life Leech, west towards the named geonid, and south for named spiders/another Life Leech spawn.
Kael Drakkel -
KD Named Overview
Add live giants to ignore list, they will assist in some of the camps so be aware of that and watch AE settings.
Velketor's Labyrinth -
Velks Named Overview
Starting with the top left and going clockwise, I camp devourer on the little platform down the ramp from PHs, tarantula in the wandering arachnid room on first floor, kobolds on either side of their room, and a few different named off the side from the little gazebo where the mission starts. I don't mess with the basement since it's too much of a hassle (risk vs reward is WAY skewed), and the other named I don't really have ideal camps for - I just hit them after the server resets since those are so common right now.
EXP CAMPS BY ZONE:
Not going to put too much effort into this section, as I feel when I'm going for purely XP loot and such is irrelevant for me. My top few choices include:
- SE caves in GD (Laima spawn area) if you can swarm (5+ mobs at a time, high kill rate)
- GMM, orcs in particular for me
- ST, but it's incredibly boring
Velium Infused Pelts -
I feel GD is the best place to farm them quickly, although you could also go to Kael or EW. Going for the kodiaks in the south and southeast, or the wurm cave towards the center of the zone gives you good access to these.
Velium Infused Spider Silks -
Either CC or Velks are your best options, CC is relatively easy and I think the southeast part of the zone is by far the most consistent. You could also go over by Queen spawn, but there aren't as many spiders. Velks is definitely a better source, but will be slightly harder, either the ground floor "3-way" where tarantula spawns or higher up the ramps, just under devourer.
Raw Velium Ore -
Ry'gorr Mines (dead side by where Inspector spawns)
Great Divide (NW by Thosgromri, SE tunnels, at forgotten raid leader, or by Squire camp)
Eastern Wastes (the coldain huts, giant fort, or in SE part of zone killing goblins and other random crap)
SUGGESTED GEARING PATH:
This will not be absolute "best in slot" but an effort to gear as efficiently as possible.
Melee Group:
- EW - Cadcane/Coldears (far northeastern camp on my reference picture) - access to 2hb for zerks/ranger, 1hp for bard/rogue/war, back and shoulders
- EW - Bolman/Windchill (middle western camp) - access to melee belt (bard/zerk/bst/monk/rogue, rangers use caster belt), knight 2h, non-ranger bow, and neck
- EW - Mahaha (Vekboz/Sofia too if you can manage them)(northern camps) - access to tank mask, 1hs for bard/rogue/war, and ranged for non-tanks
- GD - Margidor/Squire (northeastern camp) - access to ranger belt, rogue 1hp, ranged for non-tanks
- GD - Gorul/raidleader (mid western camp) - access to ranger bow, non-tank mask
- GD - Gerton (southwestern, outside mines) - access to ring and healer primary
- GD - Laima (southwestern, inside mines) - access to ring and 1hp for bard/rogue/war
- GD - Thosgromi/augur (northwestern, outside caves) - access to 1hs for bard/rogue/war, bst ear, ranged, healer 2hb
Caster group:
A small disclaimer and my personal views on gear priority:
While I have an extensive background in competitive gaming (pushing content, MMOs, etc.), I am by no means an expert and some of the following is mostly based on anecdotal evidence with minimal data to support it.
Gear priority: Tank primary/secondary > tank belt (cripple > slow if you have enc/shm/bst), and then at this point the gearing breaks off depending on group makeup...
- Melee: 2hb for melee dps (melee ranger) > 2hp (bow ranger) > 1h weapons for bard > Overdrive Punch belts on melee > Seress belts on ranger > 2hb on healer > bst pet focus > healer belt > rest of non-vis
- Caster: Pet focus (if mage heavy) > 2hb > Seress belts > pet focus (not pet heavy) > healer 2hb > healer belt > rest of non-vis
- Tank should be first dibs on all upgrades, end of discussion
CREDIT FOR CONTRIBUTORS:
- zeusizgod
- mark805
Last edited:


 ) is my puller won't grab the PH spider under the bridge if I'm camping in the hallway. He just won't go down the ramp to grab those mobs. I have the MaxZ range at 200 and the height difference from the bridge to the under the bridge is about 100. Any idea how to get my pally to pull under the bridge while in tankpuller mode?