• You've discovered RedGuides, an EverQuest multi-boxing and scripting community 🧙‍♀️⚙️. We want you to play several EQ characters at once, come join us and say hello! 👋

  • A TLP without truebox has thawed (Very Vanilla ready)
    Frostreaver

Guide - The Control Room (Group Mission)

jmaez

Well-known member
Joined
Feb 1, 2023
RedCents
1,389¢
After several attempts, I consulted with @hytiek , who provided the base strategy for this mission.

Updated 01/10/2025

Tank positioning
is key to winning this event unless your full raid gear.
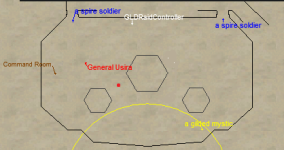
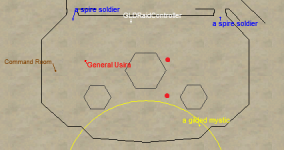
  • Start at the top red dot on the map and tank mobs there.
  • When the orb (a Neural Spark) begins its rounds, switch camps between the top bottom dot depending on the orbs location. Thanks @eqsubi15
  • Camp at the point in the image with the tank facing towards the top of the image. (If you are too far from the Grand Manipulator he will not agro and it will reset)
  • I run the mission with the tank on manual and the rest of the group on chase.
  • Only the Gilded Guardian's need to be killed so if you have a group makeup that can ignore the adds or if General Usira is at 5% and have a pile of adds just kill the Gilded Guardian's then General Usira.
1734463305203.png

Random Events During the Mission (These and a few others can cause a wipe just do it again)

These random events will occur but should be ignored or killed if they are adds to keep the strategy simple:
  • Suffering:
    • Effect: A large DoT appears in the effects window.
  • Pests Spawn:
    • Effect: Two adds appear that need to be killed.
  • Defense Shield:
    • Effect: Reduces DPS to 1 damage on the boss.
  • Manipulator Add Spawn:
    • Effect: Another Grand Manipulator mob spawns that needs to be killed.
  • Flung Out The Window:
    • Effect: A group member is thrown out of the zone (no clue on trigger).

Start The Mission​

  • Mission Activation
    • Start by hailing a Spire Soldier and saying "Dead".
    • Both Spire Soldiers will attack immediately; defeat them to begin the encounter.
  • Engage General Usira
    • Start the fight with General Usira and maintain threat.
    • Adds will spawn around the listed health thresholds and the Gilded Guardian's must be killed to complete the event:
      • At 85% HP, a Gilded Guardian spawns.
        • Gilded Guardians periodically drop agro; ensure it is controlled.
      • At 75% HP, the Grand Manipulator and another Gilded Guardian spawn.
      • At 55% HP, the orb (Neural Spark) begins its rounds, additional Gilded Guardians spawn at 45%, 35% and 25% HP.
  • Tank and Orb Positioning
    • Move to the opposite camp spot once the orb moves to the same side of the room you are on.
    • Keep the mobs facing to the outside wall of the room so your group is in the center of the room to prevent them from being flung into the orb.
  • Final Add and General Usira
    • At 10% HP, a final Grand Manipulator and another Gilded Guardian spawns.
    • General Usira's HP locks at 5% until all the Gilded Guardian's are defeated.
    • Once the final Gilded Guardian is down, finish off General Usira to complete the mission.
 

Attachments
  • Screenshot 2024-12-10 173757.png
    Screenshot 2024-12-10 173757.png
    49.2 KB · Views: 0
Last edited:
I'm glad it helped!

This is a very nice write-up, dude! Well done!
Thanks so much for this. Been trying to watch the video guides but having something written down is so much easier. Only tried the mission twice so far and made it to the orb part… thought I could heal through it, but was wrong. Your tanking positions are super helpful.

Do you keep track of the orb on the map or watch via your tanks screen? It’s a bit chaotic.
 
Thanks so much for this. Been trying to watch the video guides but having something written down is so much easier. Only tried the mission twice so far and made it to the orb part… thought I could heal through it, but was wrong. Your tanking positions are super helpful.

Do you keep track of the orb on the map or watch via your tanks screen? It’s a bit chaotic.
I just watch it on the map
 
Whoa...Just tried this and my tank was flung litterally out of the zone. What kind of crap is that!?

Both my tank and cleric got the message "You are flung out the window by the violent motions of the leviathan." They were then both zoned outside to Aureate Covert. Is that actually intentional? Seems overly broken cause no way to recover from that.
 
Whoa...Just tried this and my tank was flung litterally out of the zone. What kind of crap is that!?

Both my tank and cleric got the message "You are flung out the window by the violent motions of the leviathan." They were then both zoned outside to Aureate Covert. Is that actually intentional? Seems overly broken cause no way to recover from that.
I've never seen this but sounds hysterical!

Are you really low dps?
 
I've never seen this but sounds hysterical!

Are you really low dps?
I wasn't using any burns cause I was trying to control the add spawns. This happened about 5 minutes after engaging the General. I think he was down to 38% or around there.
 
Whoa...Just tried this and my tank was flung litterally out of the zone. What kind of crap is that!?

Both my tank and cleric got the message "You are flung out the window by the violent motions of the leviathan." They were then both zoned outside to Aureate Covert. Is that actually intentional? Seems overly broken cause no way to recover from that.
I have not encountered that
 
Wouldn't really call it hysterical. I was more pissed. The fight was going smooth. Only 1 toon got hit by the orb from a knockback. Didn't know this potential kick from the zone was a thing though.
 
I wasn't using any burns cause I was trying to control the add spawns. This happened about 5 minutes after engaging the General. I think he was down to 38% or around there.
Isn’t there an ACH for not being thrown off the ship?

The Control Room: Overboard (10 Points)
This special challenge can be completed during the mission, The Control Room.

Nobody gets thrown off the leviathan during the battle.
 
Isn’t there an ACH for not being thrown off the ship?

The Control Room: Overboard (10 Points)
This special challenge can be completed during the mission, The Control Room.

Nobody gets thrown off the leviathan during the battle.
How in the hell does anyone avoid that? I didn't see any emote, aura, or anything. Just all of a sudden I'm flying and then zoning.
 
How in the hell does anyone avoid that? I didn't see any emote, aura, or anything. Just all of a sudden I'm flying and then zoning.
It does tilt sometimes but ive never been flung out of zone. Run it again the events are random during the mission.
 
Occasionally, the orb will run right through those two red dots when it crosses from south to north, sort of creating a figure 8 with its pathing. It doesn’t stay pathing along the outside walls entirely so take note of that. Also, if mobs don’t auto aggro and run in and left unattended will reset the event, it’s happened like once or twice out of my 10 times doing this mission
 
It does tilt sometimes but ive never been flung out of zone. Run it again the events are random during the mission.
Yeah, I got the tilt part. It was annoying trying to hold position during that, but we never fell out of the middle of the area.
 
Actually killing the mystic allows the helper mobs to be able to help you with the commands. Otherwise they are blocked somehow from helping when called. Since you weren't calling for help, it probably did nothing for the mechanics.
 
Occasionally, the orb will run right through those two red dots when it crosses from south to north, sort of creating a figure 8 with its pathing. It doesn’t stay pathing along the outside walls entirely so take note of that. Also, if mobs don’t auto aggro and run in and left unattended will reset the event, it’s happened like once or twice out of my 10 times doing this mission
If you go a little further than the north spot it misses you just aim your group towards the center
 
What’s up with the tendrils that tether to you? Do you kill them or just deal with it? Made avoiding the orb a real challenge.
 
The tendrils seem to be one of the "Random" mechanics that happen in this encounter. each time I get them, it just sucks to suck and I fight through them.

Being yeeted out the window is punishment from killing the Gilded Mystic, assuming you have the random Leviathan Lurches in your mission. Killing the Mystic opens the "window" so you can say four different keywords to the frog and have dragon allies help out during the fight in various ways. If you kill the gilded mystic, window opens, if you get the room lurching nonsense, there's an excellent chance you're going out that window.

Myself, I skip the gilded mystic every time, and skip talking with the frog, but the mechanics seem to be in random order when they trigger. My worst run i had the pest adds that snared, toons being lurched into the tentacles, the stupid red aura, the leviathan/room was lurching my guys around, while being lurched to the middle tendrils, and general douchenozzle went and put his melee immunity buff up. Still killed him pre-nerf like that, but it was spicy.

TLDR:
tendrils lurch to the middle, sucks to suck
killing mystic opens window, the room lurch yeets you out if it happens. If you aren't using the frog for draggon pals help, skip the mystic entirely, it doesnt ever aggro you
 
To not get flung out of the zone you need to stay on the side you started on. that window looking glass stuff on the other side from where u start will fling you out of the zone when boss ae's..

The thrall adds u can get rid of. she emotes she summons some mobs. and 2 thralls will spawn. this happens twice.
I made some nav keys for a toon to run to the frog, target frog and say Harla Dar
back to chase modes and runner comes back to grp
harla dar comes and banishes the thralls.

when the shield goes up, if you say Keikolin to the frog, other npc comes and takes the shield down, chase mode back to grp.

i just made hotkeys on my MA to send druid.
/bcst druidname //dru mode 0
/bcst druidname //nav spawn darta_krotek

i change mode 0 because i want her to stop at frog so i can hit proper hotkey.

can watch her range in grp window. manually switch to target frog, have hotkey ready to say harla dar or Keikolin.
then just hit her hotkey /dru mode 2
sends her back to grp

This worked for me.

same thing do 10% a shot to boss, u wanna get thru 70 to 50 quickly if u can so the floor doesnt tilt. lil more dmg to boss if u get tilt floor to get out of it.

you get 2 grand manipulators as well, one above 50% and one below. kill those or they summon reinforcements. these guys u gotta find them and aggro them or fail in 30 seconds it will reset. must engage, everything else comes to you.

45 seconds in between the summoning help to drop shield and summon harla dar.
 
Next run went a lot smoother. This time, I went burn at 95% and then redirected focus on adds at 30%. Also, instead of staying between the 2 red dots as shown above, I was on the opposite side of the room further away from the Mystic. Going this way, I did not have anyone get yeeted out of the window, and also the floor never tilted. Almost a flawless run minus 1 toon getting knocked into the spark near the end.
 
This is my favorite fight in the expansion and favorite since maybe crusaders in CoV?

Where do y'all stand? I stand kinda equadistant from the two guard spawns and the manipulator, but have to dance around the orb and also get tentacled.


1734463305203.png

After being tossed out of the room standing in the spots recommened by the OP, I have had much better results standing on the opposite side. Pretty much I slow roll this fight up to about 50-60%. Then I go full burn, kill the adds, and finish off the General. Rarely, do I need to pop Glyph, but haven't had any issues with the roaming spark or room tilts since.
 
View attachment 67287

After being tossed out of the room standing in the spots recommened by the OP, I have had much better results standing on the opposite side. Pretty much I slow roll this fight up to about 50-60%. Then I go full burn, kill the adds, and finish off the General. Rarely, do I need to pop Glyph, but haven't had any issues with the roaming spark or room tilts since.
I've been testing this myself and this is the best positioning for avoiding the spark and not moving. If you get too far from the Grand Manipulator he wont agro and the event will reset. id camp the group at that spot and with your tank to the south. Ill update the guide.
 
If you leave the gilded mystic alone (and thereby skip calling for help from the frog), you will never be thrown out of the window, cause the darn thing stays closed. This assumes you can handle any of the other BS that is thrown at you, like say: generally going melee immune or something that you'd use the frog friends to get rid of.

it's trading one potential problem for another, IMO.
 
If you leave the gilded mystic alone (and thereby skip calling for help from the frog), you will never be thrown out of the window, cause the darn thing stays closed. This assumes you can handle any of the other BS that is thrown at you, like say: generally going melee immune or something that you'd use the frog friends to get rid of.

it's trading one potential problem for another, IMO.
That's good to know. I've been thrown out the window once and I don't remember ever attacking the Mystic.
 
Hello all, what is the best way to get the Neural Neutral sparks achievement? I'm able to get the other two achievements, but can't seem to find a good spot to avoid the sparks.
 
I setup where the 2 red squares are, and have waypoints setup in Nav for each one. I have a hotkey I spam when I am moving the mob to /dgza /nav wp banner and /dgza /nav wp campfire (I always have those 2 waypoints setup as my primary and secondary locations for a raid / mission / zone, so I don't have to change my hotkeys, unless I need something odd for a reason, like the pool for Hazuri). Doing that, I have successfully done the mission most times, unless I DPS the boss too much, and get too many adds at once.

I have an odd issue where I keep targeting myself on the tank to stop DPS, and he keeps re-targeting the boss and attacking. I used Sic's hotkey he suggested, but that doesn't seem to stop it from happening in a few cases.

/cwtna CheckPriorityTarget off
/cwtna UseAOE On
/cwtna /BurnAllNamed off
/dgza /makemevisible

1734532720455.png
 
I setup where the 2 red squares are, and have waypoints setup in Nav for each one. I have a hotkey I spam when I am moving the mob to /dgza /nav wp banner and /dgza /nav wp campfire (I always have those 2 waypoints setup as my primary and secondary locations for a raid / mission / zone, so I don't have to change my hotkeys, unless I need something odd for a reason, like the pool for Hazuri). Doing that, I have successfully done the mission most times, unless I DPS the boss too much, and get too many adds at once.

I have an odd issue where I keep targeting myself on the tank to stop DPS, and he keeps re-targeting the boss and attacking. I used Sic's hotkey he suggested, but that doesn't seem to stop it from happening in a few cases.

/cwtna CheckPriorityTarget off
/cwtna UseAOE On
/cwtna /BurnAllNamed off
/dgza /makemevisible

View attachment 67316
If you're in Sic Tank mode and within your camp circle, your tank will auto target the threat and attack. Put your tank in Manual mode. Then when you target yourself to stop DPS, he shouldn't auto switch back.
 
If you're in Sic Tank mode and within your camp circle, your tank will auto target the threat and attack. Put your tank in Manual mode. Then when you target yourself to stop DPS, he shouldn't auto switch back.
I am willing to bet that was it. I normally use grouper to initiate chase mode to run to the mission giver, which sets him to manual mode. In this case I campfired directly in to the mission giver, after my wizard group set a campfire there. Thanks Sic!
 
If you leave the gilded mystic alone (and thereby skip calling for help from the frog), you will never be thrown out of the window, cause the darn thing stays closed. This assumes you can handle any of the other BS that is thrown at you, like say: generally going melee immune or something that you'd use the frog friends to get rid of.

it's trading one potential problem for another, IMO.
That’s how it “should” work! But I’ve been thrown out the window without killing the mystic or calling for help.

It really feels like you should get the ACH for being thrown out, lol. Such an interesting mechanic.
 
For the no sparks achievement, I just finished this mission and was avoiding the sparks really good until about 20 percent and the whole room suddenly turned into a big old red mess with no spots for me to move to. Maybe I need to burn all at a certain point to avoid the whole room turning red?
 
For the no sparks achievement, I just finished this mission and was avoiding the sparks really good until about 20 percent and the whole room suddenly turned into a big old red mess with no spots for me to move to. Maybe I need to burn all at a certain point to avoid the whole room turning red?
The whole room turns red due to the tentacles in the center. I believe you can target/kill it, but there really is no need.

The fact that they use the same texture for the tentacle floor aura as they do for the orb floor aura is an annoyance, but you just need to avoid the orb. Having the entire floor with the red aura makes it harder to see, but it won't fail the achievement.
 
The whole room turns red due to the tentacles in the center. I believe you can target/kill it, but there really is no need.

The fact that they use the same texture for the tentacle floor aura as they do for the orb floor aura is an annoyance, but you just need to avoid the orb. Having the entire floor with the red aura makes it harder to see, but it won't fail the achievement.
Thank you!
 
Only the Gilded Guardian's need to be killed to unlock General Usira at 5%. I updated the guide.
 
Guide - The Control Room (Group Mission)

Users who are viewing this thread

Back
Top
Cart