

- Joined
- Mar 9, 2017
- RedCents
- 13,217¢
As requested here + links to guides for all RoS Heroic Missions.
Writeup on eqresource - Loots on allakhazam
Basics: This mission is kill five Named bosses in order. When the fifth boss dies, the five ghosts of the Named run from their spawns and attack your group.
Good news: Almost no trash to clear. Bosses aren't super tough if you have your defensive/burns available. You can take med-breaks or disc timer breaks at a few spots if needed. Chest can drop RoS T2 armor pieces.
Bad news: If you take too long, the bosses power up. To spawn the 4th boss you have to do a pretty heavy burn on 3-8 mobs + 2 portals, and you do not get a break between bosses 3 -> 4. If you wipe between 1->2 or 3->4, you should probably just drop mission and restart. Adds will auto-track anybody in zone and it's nearly impossible to rez recover. For final ghost fight, you'll have 5 blue-con mobs on you very quickly.
Bugged: There seems to be a bug where the 4th and 5th red-con bosses can repop even after you kill them. If up, they can summon a group member during ghost fight. This seems to be task timer related. On the speed runs with no med breaks, it doesn't seem to happen. If we take 2-3 med breaks, it does.
Campfires: Since a few phases aren't safe to zone-in, I do my campfire at the quest giver in Skyfire, Praetor Magnus Auluxus.
Back-flagging: You can taskadd either right before boss #5 if you don't need the player to win, or off-tank one ghost at the end while you swap players in.
Tanking: You have to kind of roll from Boss to Boss for some parts, so make sure you have cascading defensives set up in KA ini or can manually press your defensives as needed.
On my SK I have
Drakes - Up in the air around the open caves area. Like Skyfire, they can shoot your group with an AE if they are in range but the drakes aren't aggro'd yet. Either try to avoid them moving around, tag and kill them if you have to fight nearby, or stay indoors. Do your med breaks indoors in areas you've killed a boss.
Burn: You really want to save Burn for Boss #2 and Boss/Phase #4, then ideally for the 5 ghosts at end. You can med/reset discs after Boss #2 or Boss #4, so it's just making sure it doesn't fire early. You can either turn off BurnAllNamed=0 and fire it manually. Or I set my KA ini's to BurnAllNamed=2 so they only fire Burn for matches to MobstoBurn= in your KissAssist_Info.ini file. Add/replace this zone info in your Info.ini file:
So that will auto-Burn on Boss #2, the portal phase of spawning #4. Plus fire Burn when your KA assist targets any of 3 of the final 5 ghosts.
When you zone-in, a little ways forward is Krellnakor Guardian Garanok. Talk to him, he'll aggro and is a fairly easy kill. Don't waste Burn on him.
Bosses 1 -> 2 :
#1 = General Dekloaz - Kill the two guards in front of his tower. Head up first tower until you can just peak up to see him. Charge tank on him and use a "move-up" hotkey or chase to get group in. He has one add and does a medium AE. Use a light defensive disc on tank and you should be good. As soon as he dies, you start getting auto-track firelings running at your group on timers. Firelings blowup with an AE fire dmg and fire dot, so you have to proceed to boss #2 right away.
#2 = Magma Lord Virnax - (Burn) Run your group just inside the building near Virnax's platform. Give everybody lev, I think this boss has a knockback so you want to fight him indoors, with lev and with tank's back to a corner. Tag him from doorway and pull him + add inside. I usually start Burn on named and just tank the add until Named is down. Firelings stop once you engage boss.
Med-break - (optional) - You can recover/med/reset Burn timers where your killed Virnax. Remember the bosses will power up if you stay in instance too long, so I cut med breaks at 15-20 minutes max.
#3 = Forge Lord Wirn - He's at far end of hallway you killed Virnax in. Will have an add, but again I just tank the Named and add until Named is down. As soon as your finish #3, the portals for #4 will send out 2 "a portal strider" mobs. They auto-track your group, so be ready for them to come at you. I try to start running at the #4 platform as soon as the #3 room is clear and drag the striders there if possible. Sometimes they get to me in the Virnax/Wirn building, so I kill the first 2 striders inside that building and move to #4 quickly afterwards. Ideally, don't stop to fight them during run to #4 platform, drakes will get you.
#4 = High Arcron Ioulin - (Burn) There are 2 portals on his platform. I charge the right portal as it has one add by it, the left portal has 2 adds by it. The portals each spawn "a portal strider" on timers, so you want to kill at least one portal as quickly as you can. The portals are also not "mobs" so can be tricky to keep your KA tank targeted on. I sometimes use my tank's /mqp hotkey so I can manually keep him on the portal until it is dead. I usually kill the striders and add, then target first portal and get Burn going. If you can get one portal down, this phase is a lot easier.
I have "a portal strider" in NamesToBurn, so I start Burn when I fight the first two. You could remove those if you want to save Burn until first portal is on target.
During this spawn phase, you are outside so watch for drake AE/aggro.
Once you kill the 2nd portal, Ioulin appears and has a second or two before he's aggro. He'll pick a random target, so have the tank ready to grab him. Hopefully you still have some Burn dps going from portal phase. Make sure tank uses a secondary defensive on him if Burn defensive is gone.
If you wipe during portal phase, just /taskquit and start over. The striders don't stop hunting you so it's really hard to recover.
Med-break - (optional) - You can recover/med/reset Burn timers inside the building by Ioulin fight. Remember the bosses will power up if you stay in instance too long, so I cut med breaks at 15-20 minutes max.
Bug - So sometimes Ioulin repops while you med, not the portals and adds, just red-con Ioulin. I usually just fight him again to make sure he won't summon a player during ghost phase.
#5 = High Vizier Ri`zyr - Another boss where you can peak up from ramp until you can see him. Tank charges him and group follows in. Tough one to tank as you need to save Burn, but no big surprises. Until you kill him. Then all five ghosts wake up and start running to your group location.
Bug - So sometimes Ri'zyr, the red-con you just killed, repops when the ghosts go active (WTF.) Since I fight him at his spawn, he's auto-aggro and you have to tank/kill him a second time while the ghosts also show up. This is where I pop Reaver's Bargain or big defensive of any kind. Killing red-con Ri'zyr is priority over the blue-con ghosts.
Ghost Phase - (Burn) - Every time you kill a boss, their ghost will pop non-aggro. Now they all come charging you. They are slightly staggered as Ri'zyr's will be right on you, but the others take 15-20 seconds to show up. Tank will be taking a lot of hits, so use whatever you can to keep them up. I fire group HoTs once this phase starts, like cleric's Merciful Elixir/Celestial Regen, Paragon, Spirit of the Wood, sham's group HoTs and so-on.
I just fight in Ry'zyr's room, but there may be some advantages to moving a room down or something.
Once all ghosts are done, chest will pop back on the first bridge. Drakes de-spawn so safe to run back. However, the bug of red-cons re-popping can still happen, so don't hang out near the boss spawns.
Some helpful EQBC group move hotkeys I set on my tank to use in this mission:
Move up in #1 General tower, to room just below Named:
Move to #2 safe hall to tank Magma Lord (note you need to get close before using this, it can run your group into lava from some starting spots):
Move to #4 portal phase, this puts you in a "safe" spot between the two portals, but you can still get drake/strider aggro here.
Move to waypoint from #4 med-break room heading to #5 building. Going straight to #5 loc, I get stuck on railing sometimes, so added this waypoint. Not "safe", so press #5 hotkey once you're here. You can bring aggro'd drakes inside building #5 to fight if needed.
Move to #5 boss room, on ramp where you can peak in at boss.
Move everybody to the chest. Nice work!
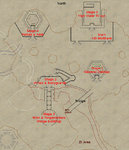
This is the Balance of Power raid map, but the boss locs are the same: (credit to eqfreelance.net for their nice raid write-ups)
Writeup on eqresource - Loots on allakhazam
Basics: This mission is kill five Named bosses in order. When the fifth boss dies, the five ghosts of the Named run from their spawns and attack your group.
Good news: Almost no trash to clear. Bosses aren't super tough if you have your defensive/burns available. You can take med-breaks or disc timer breaks at a few spots if needed. Chest can drop RoS T2 armor pieces.
Bad news: If you take too long, the bosses power up. To spawn the 4th boss you have to do a pretty heavy burn on 3-8 mobs + 2 portals, and you do not get a break between bosses 3 -> 4. If you wipe between 1->2 or 3->4, you should probably just drop mission and restart. Adds will auto-track anybody in zone and it's nearly impossible to rez recover. For final ghost fight, you'll have 5 blue-con mobs on you very quickly.
Bugged: There seems to be a bug where the 4th and 5th red-con bosses can repop even after you kill them. If up, they can summon a group member during ghost fight. This seems to be task timer related. On the speed runs with no med breaks, it doesn't seem to happen. If we take 2-3 med breaks, it does.
Campfires: Since a few phases aren't safe to zone-in, I do my campfire at the quest giver in Skyfire, Praetor Magnus Auluxus.
Back-flagging: You can taskadd either right before boss #5 if you don't need the player to win, or off-tank one ghost at the end while you swap players in.
Tanking: You have to kind of roll from Boss to Boss for some parts, so make sure you have cascading defensives set up in KA ini or can manually press your defensives as needed.
On my SK I have
- Krellnakor Mantle in Burn, use Tylix as my backup/too many adds, Cursed Guardian if Tylix is down.
- Shield Flash whenever I charge a boss
- Deflection Disc on ghost phase when first 3-4 ghosts arrive.
- Leechcurse and Spite of Kra'Du - Well I have nothing else available, might as well press something for disc window...
- Use any extra heal stuff as needed or on Burn - T1/T2 Breastplate, BloodDrinker's Coating, epic 2.0, Bloody Orc Signet, Reflexive Revulsion (group heal)
- Reaver's Bargain - If all your main disc's are down and you have a lot more to tank, I pop this AA. You tank like a champ but have to watch your endurance/mana drain. When it runs out, use Thought Leech right away to regen mana/endur and pop any group regens avail (BST Paragon & Enduring Frenzy & Reflexive Sundering/Bard Dico/Ench Robe & AA/potions.)
Drakes - Up in the air around the open caves area. Like Skyfire, they can shoot your group with an AE if they are in range but the drakes aren't aggro'd yet. Either try to avoid them moving around, tag and kill them if you have to fight nearby, or stay indoors. Do your med breaks indoors in areas you've killed a boss.
Burn: You really want to save Burn for Boss #2 and Boss/Phase #4, then ideally for the 5 ghosts at end. You can med/reset discs after Boss #2 or Boss #4, so it's just making sure it doesn't fire early. You can either turn off BurnAllNamed=0 and fire it manually. Or I set my KA ini's to BurnAllNamed=2 so they only fire Burn for matches to MobstoBurn= in your KissAssist_Info.ini file. Add/replace this zone info in your Info.ini file:
Code:
[Gorowyn: Balance of Power_I]
MezImmune=List up to 10 mobs. Use full names i.e. a green snake,a blue tiger,a wide eye ooze or NULL
MobsToPull=List up to 25 mobs. Use full names i.e. a green snake,a blue tiger,a wide eye ooze or ALL for all mobs
MobsToIgnore=List up to 25 mobs. Use full names i.e. a green snake,a blue tiger,a wide eye ooze or NULL
MobsToBurn=Magma Lord Virnax,a portal strider,an archon portal,Undying Magma Lord Virnax,Undying General Dekloaz,Undying High Arcron Ioulin
PullPath=Place holder for path file. Not yet impletmented.
So that will auto-Burn on Boss #2, the portal phase of spawning #4. Plus fire Burn when your KA assist targets any of 3 of the final 5 ghosts.
When you zone-in, a little ways forward is Krellnakor Guardian Garanok. Talk to him, he'll aggro and is a fairly easy kill. Don't waste Burn on him.
Bosses 1 -> 2 :
#1 = General Dekloaz - Kill the two guards in front of his tower. Head up first tower until you can just peak up to see him. Charge tank on him and use a "move-up" hotkey or chase to get group in. He has one add and does a medium AE. Use a light defensive disc on tank and you should be good. As soon as he dies, you start getting auto-track firelings running at your group on timers. Firelings blowup with an AE fire dmg and fire dot, so you have to proceed to boss #2 right away.
#2 = Magma Lord Virnax - (Burn) Run your group just inside the building near Virnax's platform. Give everybody lev, I think this boss has a knockback so you want to fight him indoors, with lev and with tank's back to a corner. Tag him from doorway and pull him + add inside. I usually start Burn on named and just tank the add until Named is down. Firelings stop once you engage boss.
Med-break - (optional) - You can recover/med/reset Burn timers where your killed Virnax. Remember the bosses will power up if you stay in instance too long, so I cut med breaks at 15-20 minutes max.
#3 = Forge Lord Wirn - He's at far end of hallway you killed Virnax in. Will have an add, but again I just tank the Named and add until Named is down. As soon as your finish #3, the portals for #4 will send out 2 "a portal strider" mobs. They auto-track your group, so be ready for them to come at you. I try to start running at the #4 platform as soon as the #3 room is clear and drag the striders there if possible. Sometimes they get to me in the Virnax/Wirn building, so I kill the first 2 striders inside that building and move to #4 quickly afterwards. Ideally, don't stop to fight them during run to #4 platform, drakes will get you.
#4 = High Arcron Ioulin - (Burn) There are 2 portals on his platform. I charge the right portal as it has one add by it, the left portal has 2 adds by it. The portals each spawn "a portal strider" on timers, so you want to kill at least one portal as quickly as you can. The portals are also not "mobs" so can be tricky to keep your KA tank targeted on. I sometimes use my tank's /mqp hotkey so I can manually keep him on the portal until it is dead. I usually kill the striders and add, then target first portal and get Burn going. If you can get one portal down, this phase is a lot easier.
I have "a portal strider" in NamesToBurn, so I start Burn when I fight the first two. You could remove those if you want to save Burn until first portal is on target.
During this spawn phase, you are outside so watch for drake AE/aggro.
Once you kill the 2nd portal, Ioulin appears and has a second or two before he's aggro. He'll pick a random target, so have the tank ready to grab him. Hopefully you still have some Burn dps going from portal phase. Make sure tank uses a secondary defensive on him if Burn defensive is gone.
If you wipe during portal phase, just /taskquit and start over. The striders don't stop hunting you so it's really hard to recover.
Med-break - (optional) - You can recover/med/reset Burn timers inside the building by Ioulin fight. Remember the bosses will power up if you stay in instance too long, so I cut med breaks at 15-20 minutes max.
Bug - So sometimes Ioulin repops while you med, not the portals and adds, just red-con Ioulin. I usually just fight him again to make sure he won't summon a player during ghost phase.
#5 = High Vizier Ri`zyr - Another boss where you can peak up from ramp until you can see him. Tank charges him and group follows in. Tough one to tank as you need to save Burn, but no big surprises. Until you kill him. Then all five ghosts wake up and start running to your group location.
Bug - So sometimes Ri'zyr, the red-con you just killed, repops when the ghosts go active (WTF.) Since I fight him at his spawn, he's auto-aggro and you have to tank/kill him a second time while the ghosts also show up. This is where I pop Reaver's Bargain or big defensive of any kind. Killing red-con Ri'zyr is priority over the blue-con ghosts.
Ghost Phase - (Burn) - Every time you kill a boss, their ghost will pop non-aggro. Now they all come charging you. They are slightly staggered as Ri'zyr's will be right on you, but the others take 15-20 seconds to show up. Tank will be taking a lot of hits, so use whatever you can to keep them up. I fire group HoTs once this phase starts, like cleric's Merciful Elixir/Celestial Regen, Paragon, Spirit of the Wood, sham's group HoTs and so-on.
I just fight in Ry'zyr's room, but there may be some advantages to moving a room down or something.
Once all ghosts are done, chest will pop back on the first bridge. Drakes de-spawn so safe to run back. However, the bug of red-cons re-popping can still happen, so don't hang out near the boss spawns.
Some helpful EQBC group move hotkeys I set on my tank to use in this mission:
Move up in #1 General tower, to room just below Named:
Code:
/bcaa //nav loc -238 -1545 -161Move to #2 safe hall to tank Magma Lord (note you need to get close before using this, it can run your group into lava from some starting spots):
Code:
/bcaa //nav loc -435 -1215 -229.2Move to #4 portal phase, this puts you in a "safe" spot between the two portals, but you can still get drake/strider aggro here.
Code:
/bcaa //nav loc 1 -1099 -295Move to waypoint from #4 med-break room heading to #5 building. Going straight to #5 loc, I get stuck on railing sometimes, so added this waypoint. Not "safe", so press #5 hotkey once you're here. You can bring aggro'd drakes inside building #5 to fight if needed.
Code:
/bcaa //nav loc -126 -1412 -283.9Move to #5 boss room, on ramp where you can peak in at boss.
Code:
/bcaa //nav loc -109.7 -1494.3 -190.62Move everybody to the chest. Nice work!
Code:
/bcaa //nav loc -394 -1511 -228This is the Balance of Power raid map, but the boss locs are the same: (credit to eqfreelance.net for their nice raid write-ups)
Last edited:

