MQ2Discord
| MQ2Discord | |
|---|---|
| Issue commands from discord to EverQuest |
| Authors | alynel, Knightly |
|---|---|
| Software type | Plugin |
| Config file | MQ2Discord.yaml
|
| Maintained | Yes and supported |
| Links |
🏠Resource (review) |
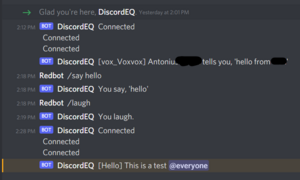
Plugin that does pretty much what the name says, connects MacroQuest to Discord. Chat messages that match a filter get sent to a Discord channel, and any commands you enter in that channel get executed:
Commands
| Syntax | Description |
|---|---|
| /discord {reload|process|debug|stop} | Sends commands to be processed by the config file, reloads the config file, and controls debugging. |
Settings
Here's an example MQ2Discord.yaml,
token: abcdefg123456789.ABcdeFGHi.A1B3e3lkawLKW34 # This is the token you got when following the instructions to setup discord your bot.
user_ids:
  - 1234567890 # These are the user IDs that are allowed to send messages to your bot. Right click on your name in the Discord member's list and select "Copy ID" to get this.
characters:
  vox_Voxvox: # This is the character you want the settings to be loaded on in the format of servername_Charactername.  Discord will tell you if it can't find your character and this is what it's talking about.
    - name: Billyschannel # This is the name of the configuration, most people are only going to have one, but you can have as many as you'd like.
      id: 12345678901231351 # This is the channel ID you want messages to go to, you can get this by right clicking on the channel in Discord and doing "Copy ID"
      allowed: # Allowed tells you what you want to see, though you don't need something in both Allowed AND Notice
        - "#*# auctions, #*#"
      blocked: # Blocked tells you what to skip if it matches an allowed or notify and also matches the block.  These won't be shown.
        - "Thatjerk auctions, #*#"
      notify: # Notify tags @everyone in the channel when this matches.  Good for getting notices on things you really want to know about without having notices turned on for everything in the channel.
        - "#*#WTS My Soul#*#"
      prefix: "" # If you want to prefix the message in Discord with anything.  Like putting your character name in front of it if you share channels between characters.
      send_connected: false # Should Discord tell you when you connect.  If you're troubleshooting turn this on, but I usually leave it off.
      allow_commands: true # Whether you can receive commands through this channel (commands will still only be accepted by the above user_ids).  For most this is probably true
      show_command_response: 2000 # After you send a command from Discord to EQ, MQ2Discord automatically sends all chat messages back to Discord.  This is how long in milliseconds you want it to do that.  Longer is great for viewing chat, horrible for combat spam.  Default is 2 seconds and of course you can always keep it going with /echo hi repeatedly
servers:
  {}
classes:
  {}
groups:
  - name: YourGroup
    characters:
      - vox_Voxvox
      - server_OtherCharInGroup
      - server_OneMore
    channels:
      - name: Deaths
        id: 12345678901231351
        allowed:
          - You have been slain by
        blocked:
          []
        notify:
          []
        prefix: "[${Me.Name}]"
        send_connected: true
        allow_commands: false
        show_command_response: 0
all:
  - name: TellsChannel
    id: 12345678901231351
    allowed:
      - tells you
    blocked:
      - "|${Me.Pet.DisplayName}| tells you#*#"
    notify:
      []
    prefix: "[${EverQuest.Server}_${Me.Name}]"
    send_connected: true
    allow_commands: false
    show_command_response: 0
Setup
- Create a server & channel(s) from the Discord client
- Create a Discord bot & add it to your server, per the guide here: https://github.com/reactiflux/discord-irc/wiki/Creating-a-discord-bot-&-getting-a-token
- Enable developer mode in the discord app (Discord client settings -> advanced)
- Open the MQ2Discord.yaml in a code editor. We recommend Visual Studio Code. (Text editors are not recommended for YAML files)
- Enter the token for the bot in your MQ2Discord.yaml. Read the guide above to find the bot token.
- Enter your user_id (right click your username in discord, copy id) in MQ2Discord.yaml
- Enter your server_Character name and the channel id in MQ2Discord.yaml. Server name must the shortname.
- In game, load the plugin with
/plugin mq2discord - If it's already loaded, reload the config with
/discord reload. If there are any errors in your .yaml file, it should tell you the line to look at.
See also
