
Adding a manual
Whether this is for your own software or for a work you admire, I'd like to thank you for creating a manual! Your writing is valuable and will help someone else, perhaps many others. A wiki manual is only needed for projects that have lots of commands or are otherwise complex. Please contact Redbot if you need assistance, he's always excited to work on the wiki.
Manual Form
- Head to Form:Manual and type in the name of the software. e.g. "MQ2AdvPath" or "KissAssist"
- Most form inputs are optional, including the ones listed below. Here are some that can be confusing at first:
- Command Names. Simply write the "/command" with no prefix and no options. If there are multiple /commands, add a comma after, each, one, please. We think commands are important enough to each warrant their own wiki page (even if they're extremely simple) so that's where you'll add any specific information for the command (syntax, description, options, examples, etc.) If a /command already exists with the same name, add your software's name in parentheses after the command. e.g. /command (MyMacro) and consider warning users of any possible conflicts.
- Top-Level Objects. This is a plugin-specific field. When looking through plugin code, a TLO definition looks like this:For this field, you'd add the word Zone. Other information about the TLO, such as forms and its data types, are added on another page that you don't have to worry about for now.
AddMQ2Data("Zone", datatypes::MQ2ZoneType::dataZone); - Settings. This is a free-form section. We recommend including either a default configuration file here, or a table with setting descriptions (especially if these settings aren't going to be explained on command pages). If the software uses a configuration file, including a default or example config wrapped in tags <syntaxhighlight lang=ini> like this </syntaxhighlight> is helpful for everyone.
- If you want to include other sections that aren't listed on the form, add them to the settings section. For example, to add a quick-start guide, write == Quick Start == in the settings box.
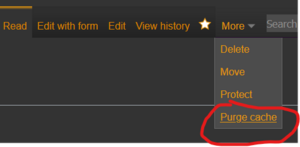
- After you "save page", your page will look like it's missing most of the information you just added. Here's what you need to do after every edit:
- 🚨🚨🚨PURGE CACHE🚨🚨🚨
- You should now have a finished page. If there's extra information to add, the page should alert you, like this:

Command Form
- You finished the Manual Form above, so now click the red link(s) for /commands that need more info, and you'll be directed to a command form.
- Syntax is the only required field. There's a key at the top of the page for writing proper syntax. If there are a lot of options it's best to make this generic; rather than including every option in the syntax just write the word [option]. See /moveto for an example.
- 🚨The pipe "|" character breaks the wiki🚨, which stinks, so you'll want to use {{pipe}} instead. If you're doing a lot of editing, consider making a keyboard macro that writes {{pipe}}.
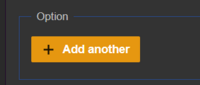 For every "flag" or "option" your command allows, use this button to add them. If some options are very similar or exact opposites, such as On|Off, add them in the same field.
- "See also" is automatically filled after page creation, but you can add more if you wish.
TLO Form (plugin specific)
- All fields are optional. Zone is an example of a TLO that utilizes each field, but it's an exception. Most plugins make little use of TLOs other than to provide access to a single data type (which they annoyingly often give the same name and case). Here's some clarification on tricky fields:
- Forms. This field should be filled when the TLO is able to return information without naming a data type member (i.e. no period needed.)
${Zone}and${Zone[poknowledge]}are examples. Most non-core plugins do not utilize forms. If there are multiple forms click "add another" for each one. - The data type will have its own page, so *do not* list its members here, only the data type itself. For most plugins, this is the only field you will fill out on the TLO page. Data Types are defined in code like this,
MQ2SpawnType::MQ2SpawnType() : MQ2Type("spawn") { ... }- In this case, you'd simply write spawn in the data type field. If the plugin author follows the naming convention of core, the datatype will be all lowercase, however many plugin authors name their Data Types exactly the same as the TLO.
- "See also" is automatically filled after page creation, but you can add more if you wish.
- Forms. This field should be filled when the TLO is able to return information without naming a data type member (i.e. no period needed.)
- Save the page. 🚨Remember to "purge cache"🚨 to see the finished product. If you added a data type, you'll see red links and requests for more information.
Data Type Form (plugin specific)
- After finishing the TLO page, you'll have Data Type(s) to add. Hit the red link and you'll be brought to the Data Type form.
- Most fields are optional. For Data Type Members, here's how to find them in the code,
case SpawnMembers::IsSummoned: // if its a summoned being (pet for example)
		Dest.Set(pSpawn->bSummoned);
		Dest.Type = pBoolType;
		return true;
- "Type" is the datatype used for this member, in the case above it's pBoolType, so write "bool".
- "Member" is the name of the member, and any index it accepts. In this case it's "IsSummoned"
- "Methods" These are rare in plugins, and we don't currently have a section for them. For now, treat them like Members but label the "Type" as "action" and bug Redbot to do something about this.
- Save the page. 🚨Remember to "purge cache"🚨 to see the finished product.